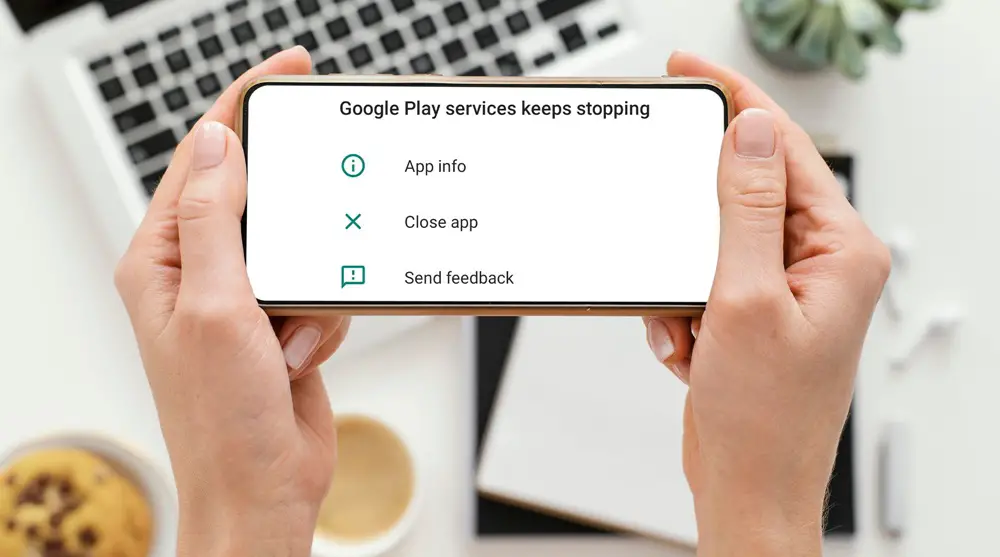
Google Play Services, the silent powerhouse behind your Android experience, ensures everything runs smoothly. Yet, we have all faced the frustrating “Google Play Services Keeps Stopping” error. In this quick guide, we’ll explore 11 simple fixes to fix the “Google Play Services Keeps Stopping” annoyance and keep your Android world hassle-free.
What is Google Play Services?
It’s important to note that Google Play Services is distinct from the Google Play Store.
While the Google Play Store serves as the storefront for users to download, update, and manage their applications, Google Play Services operates behind the scenes, focusing on functionalities that enhance app performance.
Simply put, Google Play Store is the marketplace for accessing and discovering new apps, whereas Google Play Services functions as the engine keeping your Android device running smoothly.
Despite its crucial role, users may encounter the “Google Play Services Keeps Stopping” error, disrupting the smooth operation of apps.
To swiftly fix this issue, let’s explore the common culprits causing “Google Play Services Keeps Stopping” error and implement quick fixes that will have your Android device running smoothly again.
1. Restart Your Device
Restarting your device is a quick and sometimes overlooked solution that can resolve various issues, offering a fresh start to your Android experience. It aids in clearing temporary glitches, refreshing system processes, and often resolves minor issues, including the “Google Play Services Keeps Stopping” error. If the error persists after restarting, proceed with the following steps to address specific aspects of the issue.
2. Check Device Storage
Insufficient storage on your device can lead to performance issues, including errors like “Google Play Services Keeps Stopping.” Checking and optimizing your device’s storage can free up space, potentially fixing the issue.
Here’s how to check your device’s storage:
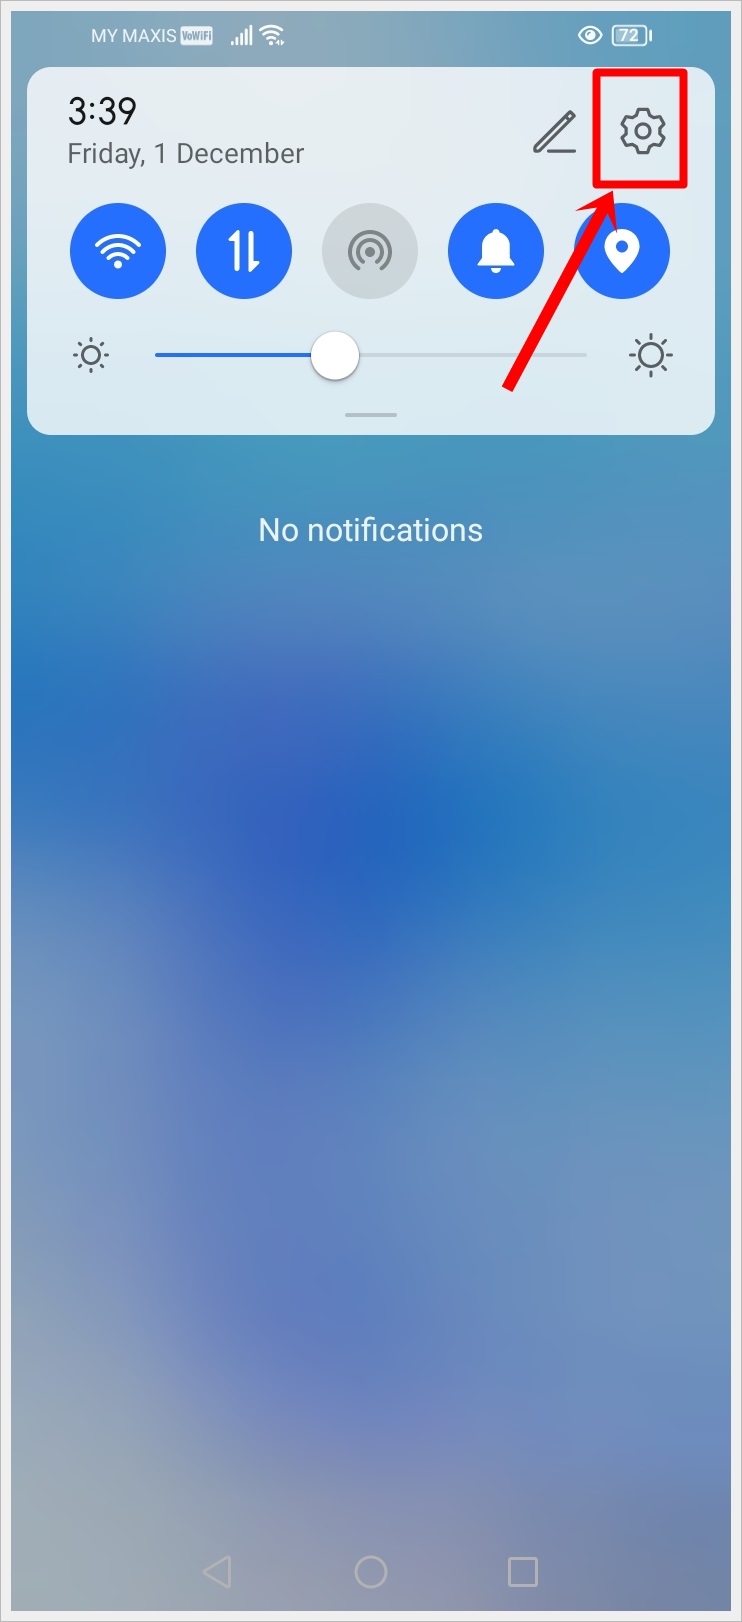
1. Open Settings: Unlock your Android device and navigate to the “Settings” app. It’s usually represented by a gear icon.
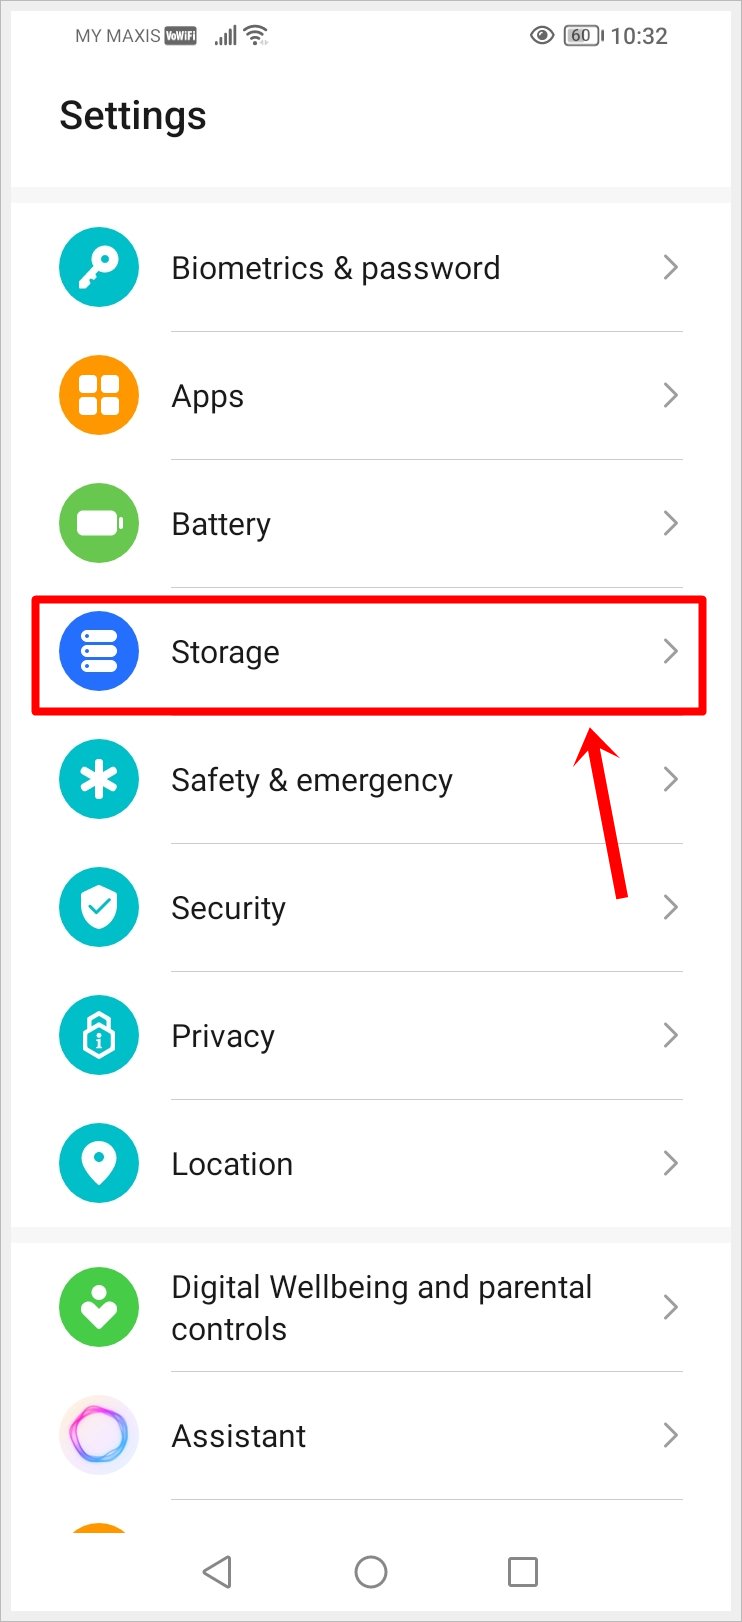
2. Navigate to Storage: Scroll down and look for “Storage,” “Device Care,” or a similar option in the settings menu. Tap on it.
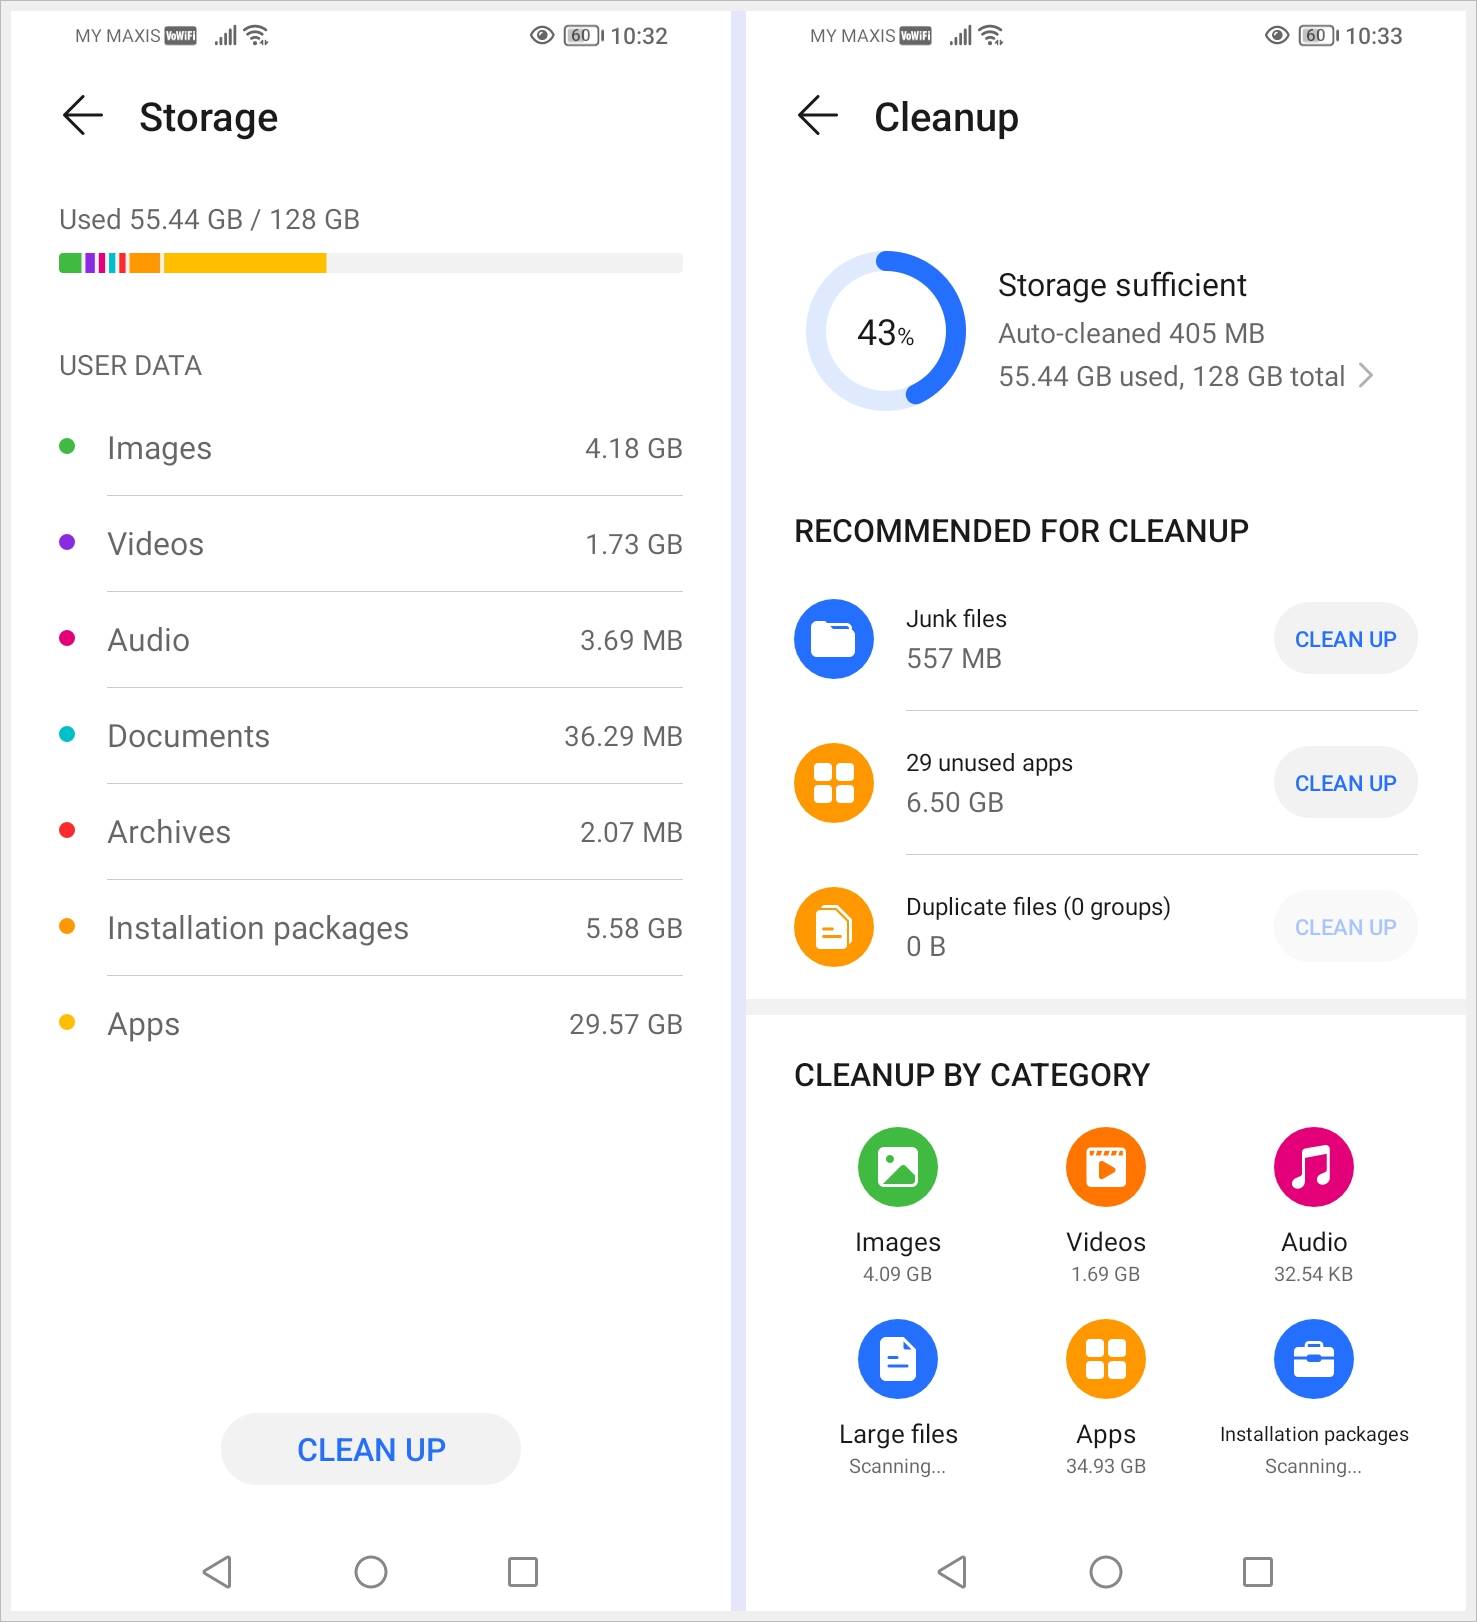
3. Clean, Delete, Clear or Remove: It depends on your device. Look for the page where you can check your device’s storage overview and perform actions such as cleaning unnecessary files, deleting cache, or removing unused apps to free up space.
4. Restart Your Device: After cleaning up your device’s storage, restart it to ensure the changes take effect and to potentially fix the “Google Play Services Keeps Stopping” error.
Read also: How to Stop Auto Backup on Google Photos [Android and iOS]
3. Clear Cache and Data
Clearing the cache and data for Google Play Services is like giving it a fresh start. Over time, the cache can accumulate temporary files and data, leading to glitches and performance issues. By clearing these, you’re essentially wiping the slate clean and helping to fix common hiccups and errors that may be causing the “Google Play Services Keeps Stopping” problem.
Follow these steps to clear cache and data:
1. Open Settings: Access the “Settings” app on your Android device.

2. Apps or Application Manager: Scroll down and find either “Apps” or “Application Manager” in the Settings menu. This may vary slightly depending on your device.
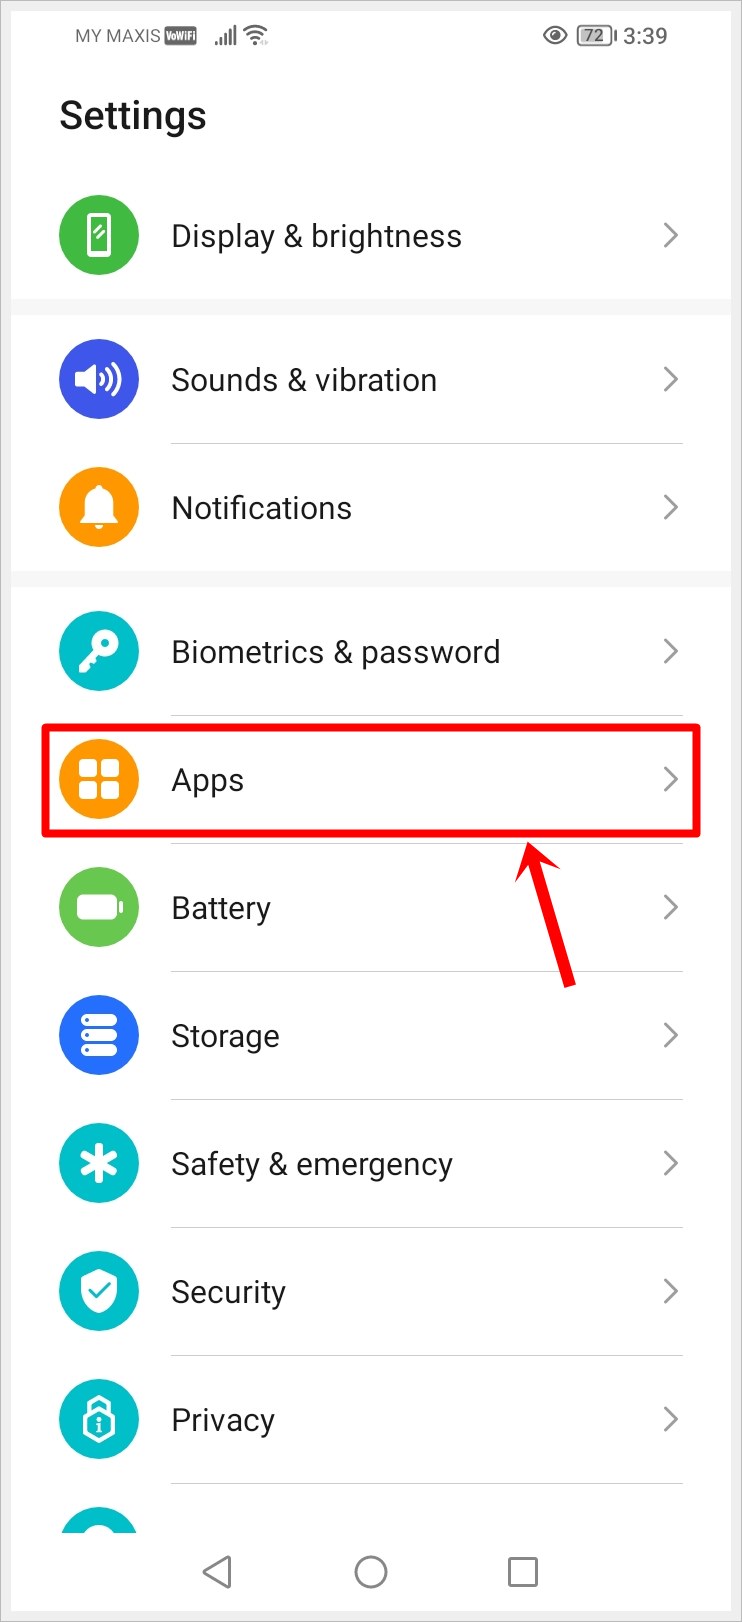
3. Locate Google Play Services: Look for “Google Play Services” in the list of apps. Tap on it to open the app settings.
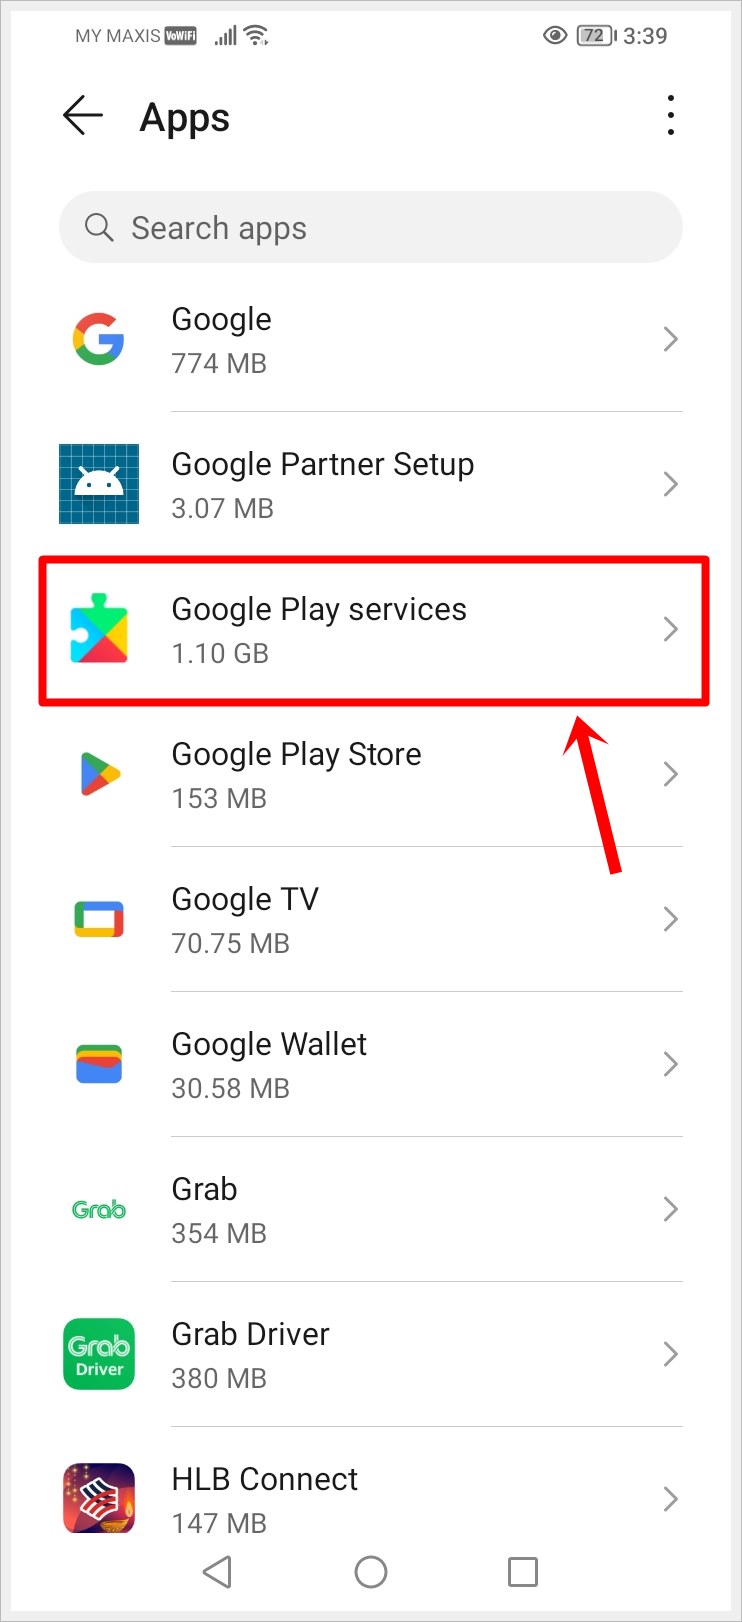
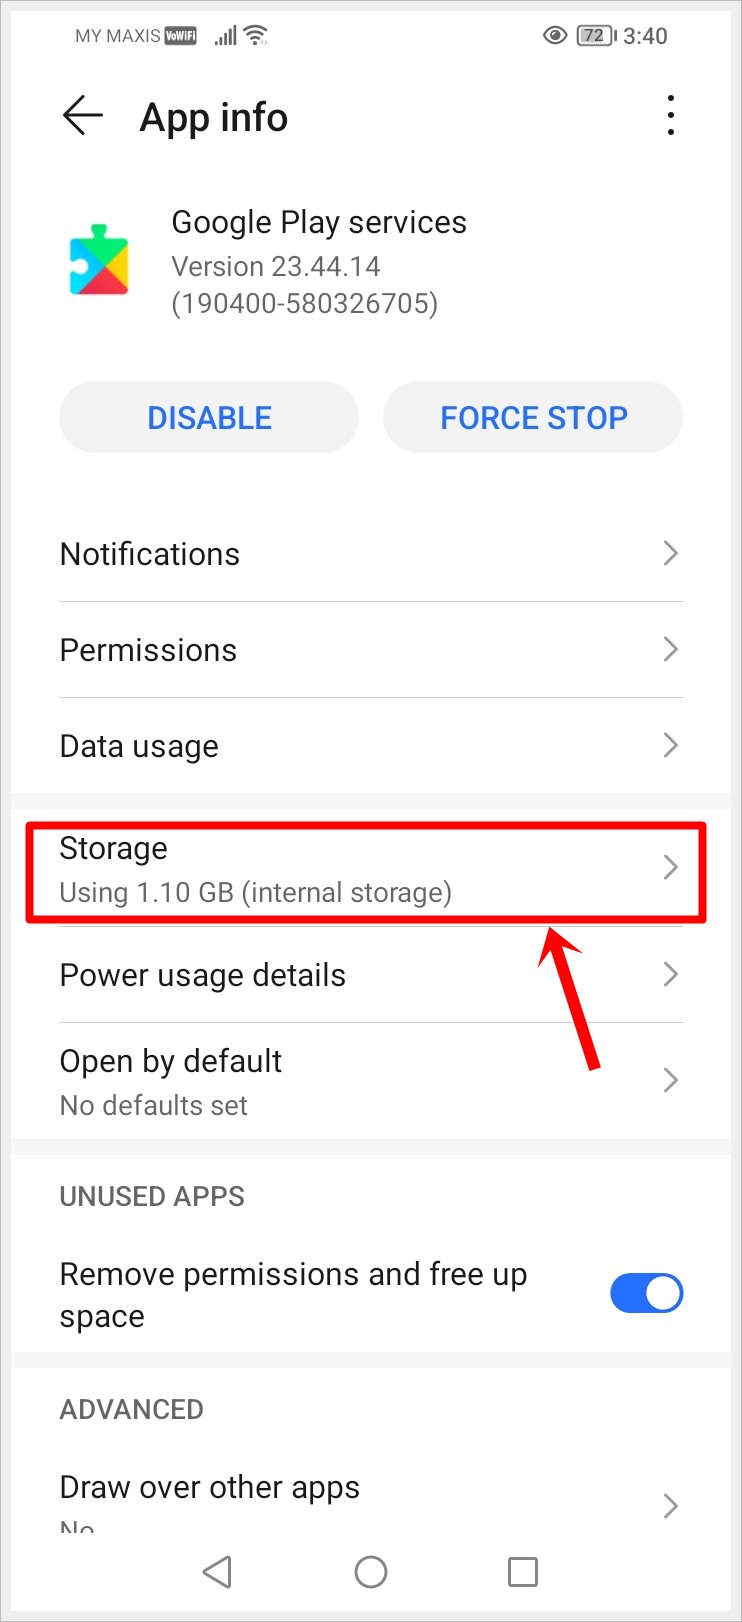
4. Clear Cache:
- Inside the Google Play Services app settings, you’ll find the option to clear the cache. Tap on “Storage.”
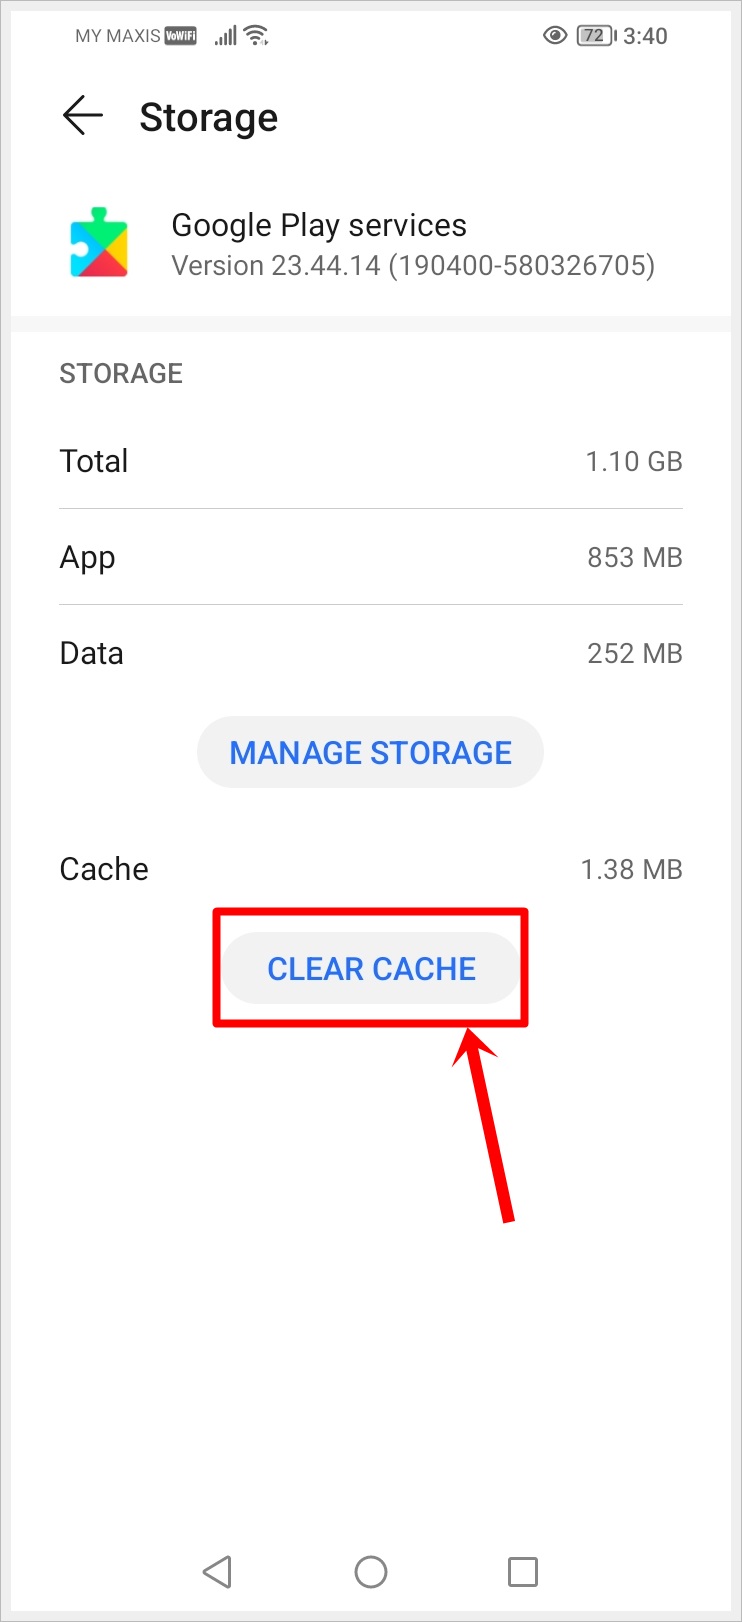
- Next, tap on “Clear Cache.” Confirm your action if prompted.
5. Clear All Data:
- While still in the Google Play Services app settings, tap on “Manage Storage.”
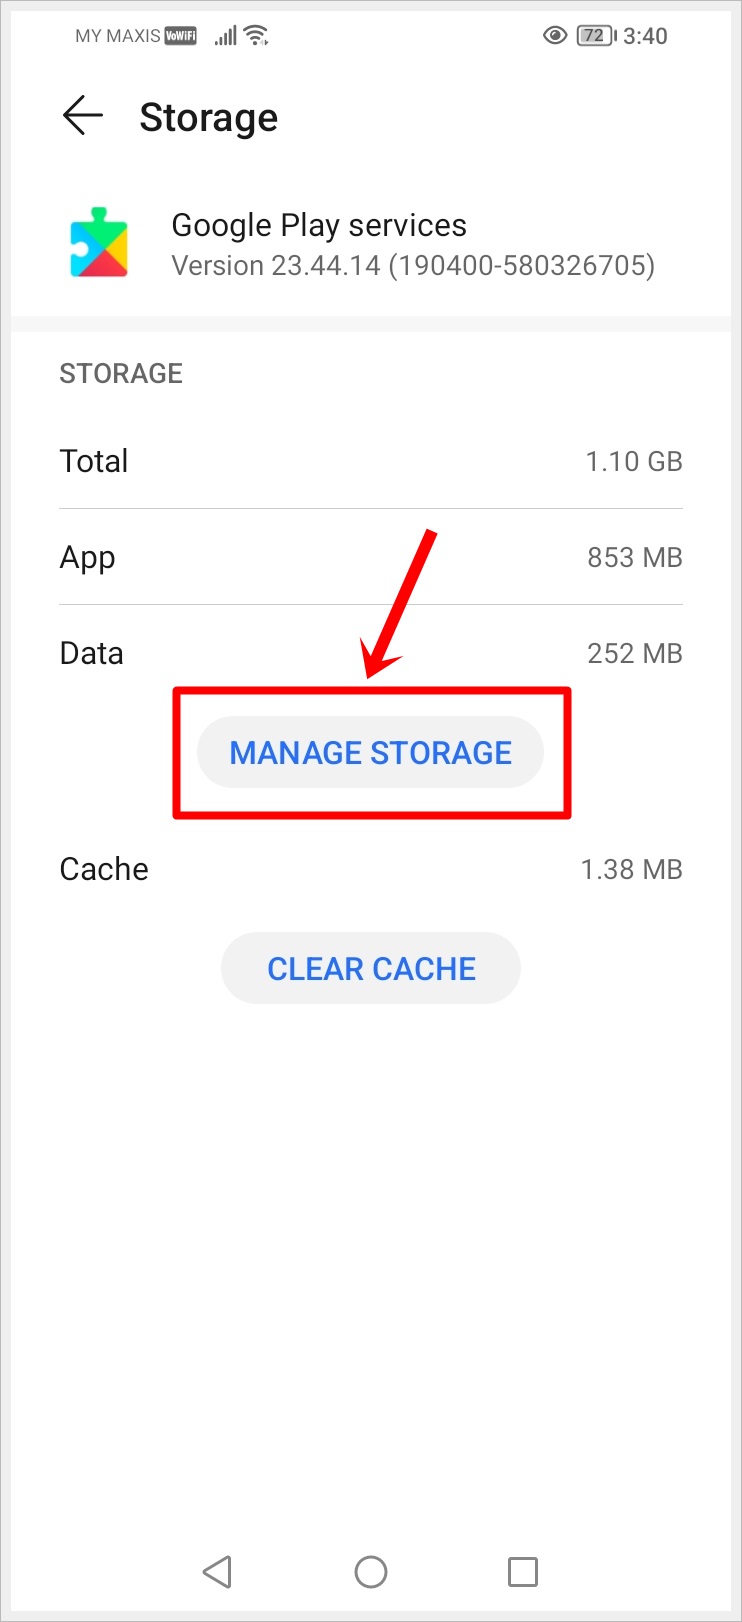
- Tap on “Clear All Data” on the next page. Confirm your action if prompted. Be aware that clearing data will reset the app’s settings to default.
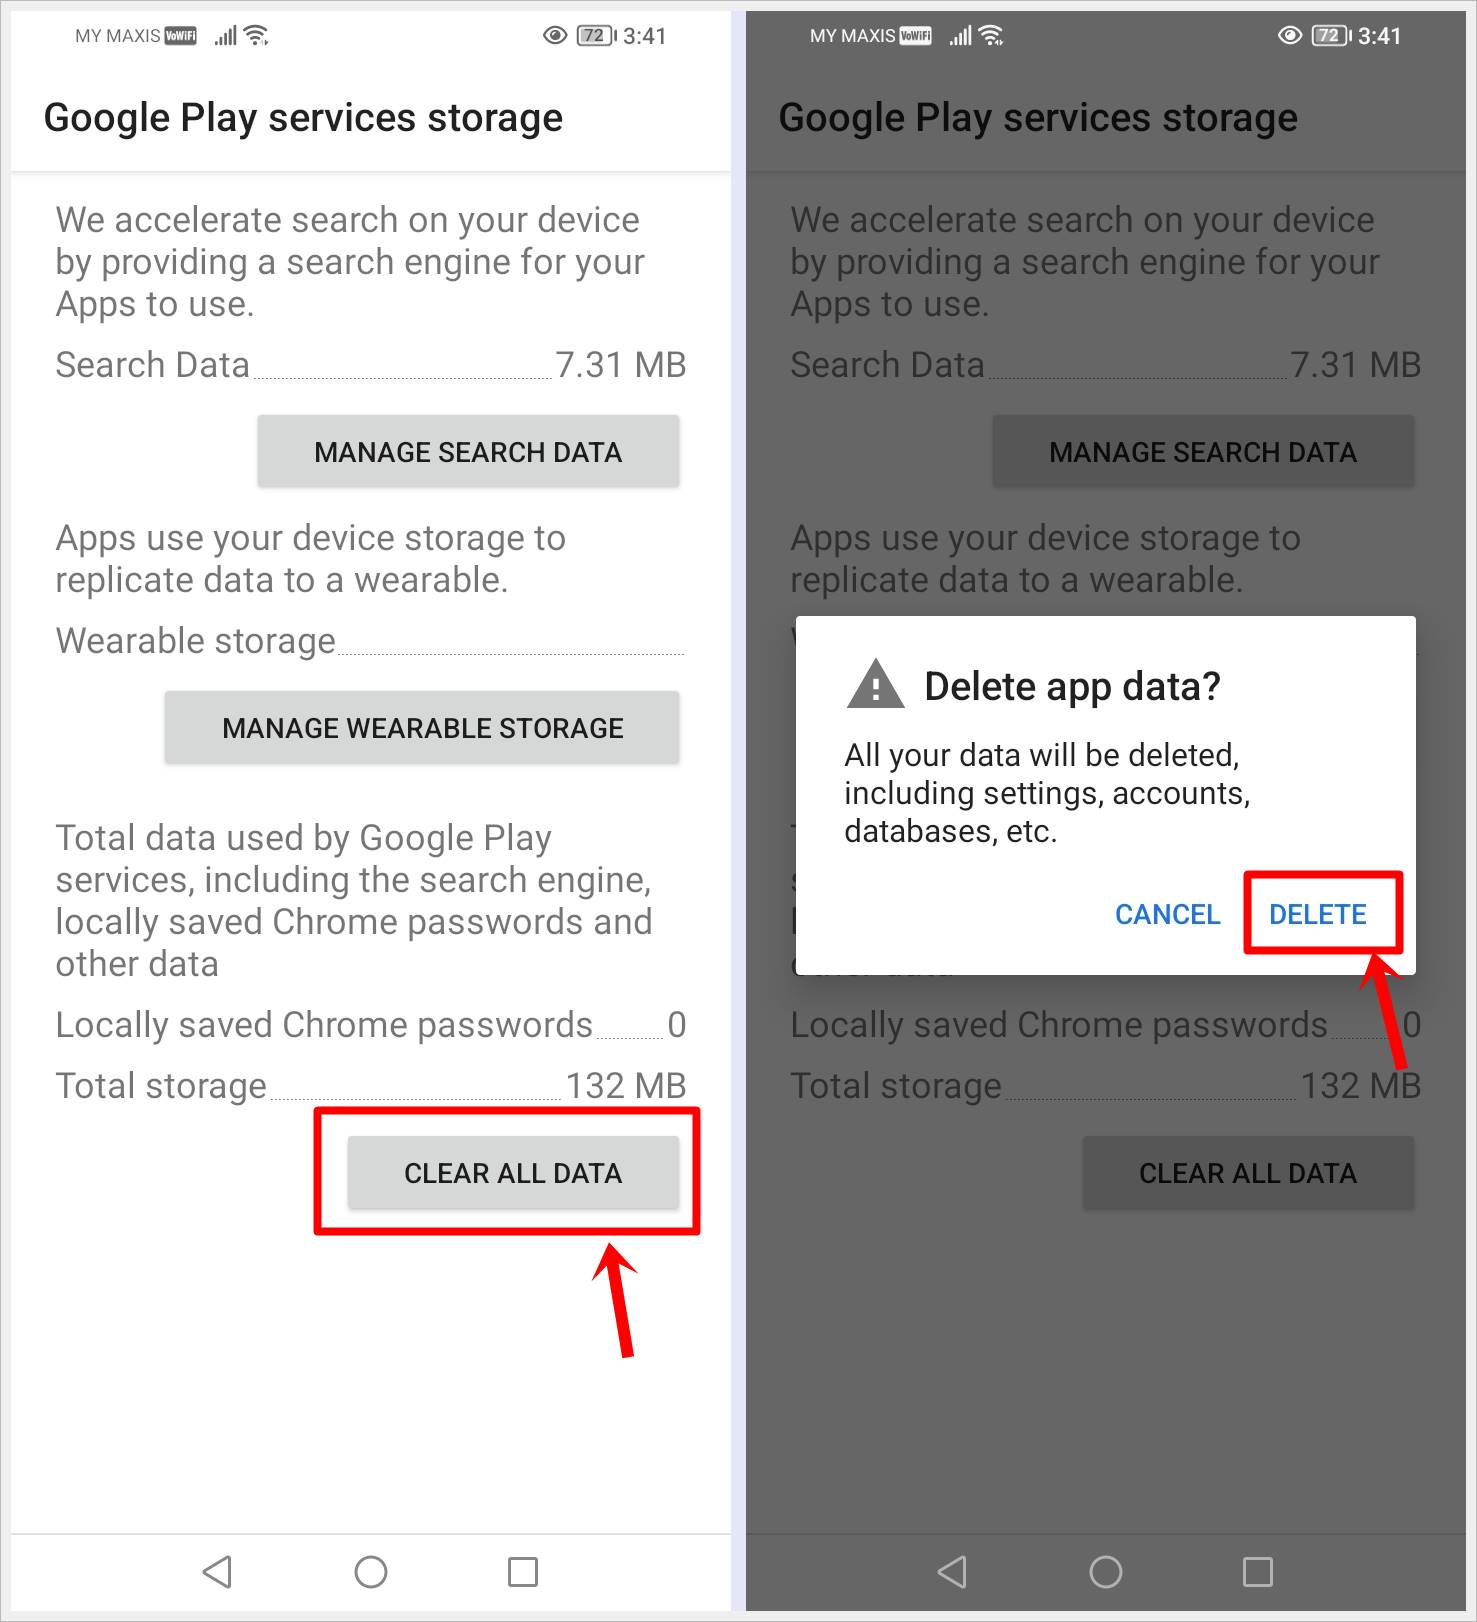
6. Restart Your Device: After clearing the cache and data, restart your Android device.
4. Update All Your Apps
Ensuring that all your apps, including Google Play Services, are up-to-date is crucial for the smooth functioning of your Android device. Updates often include bug fixes, performance enhancements, and compatibility improvements. If you’re experiencing the “Google Play Services Keeps Stopping” error, outdated software might be the culprit. Updating all your apps can address these issues by providing the latest features and optimizations.
Follow these steps to update all your apps:
1. Open Google Play Store: Tap on the Google Play Store icon.
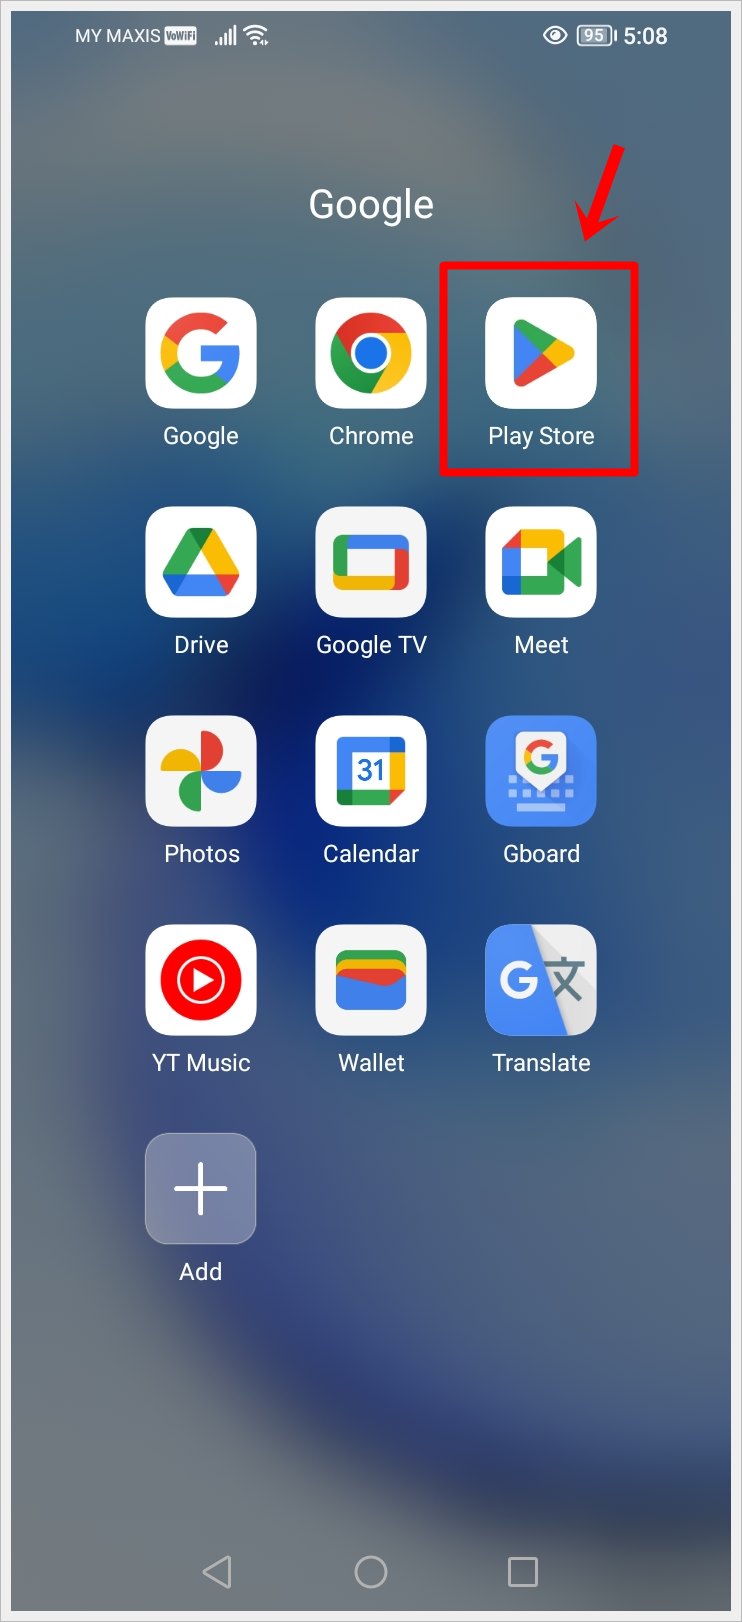
2. Open Google Account Settings: In Play Store, tap on your Google Account profile picture in the top-right corner of your device.
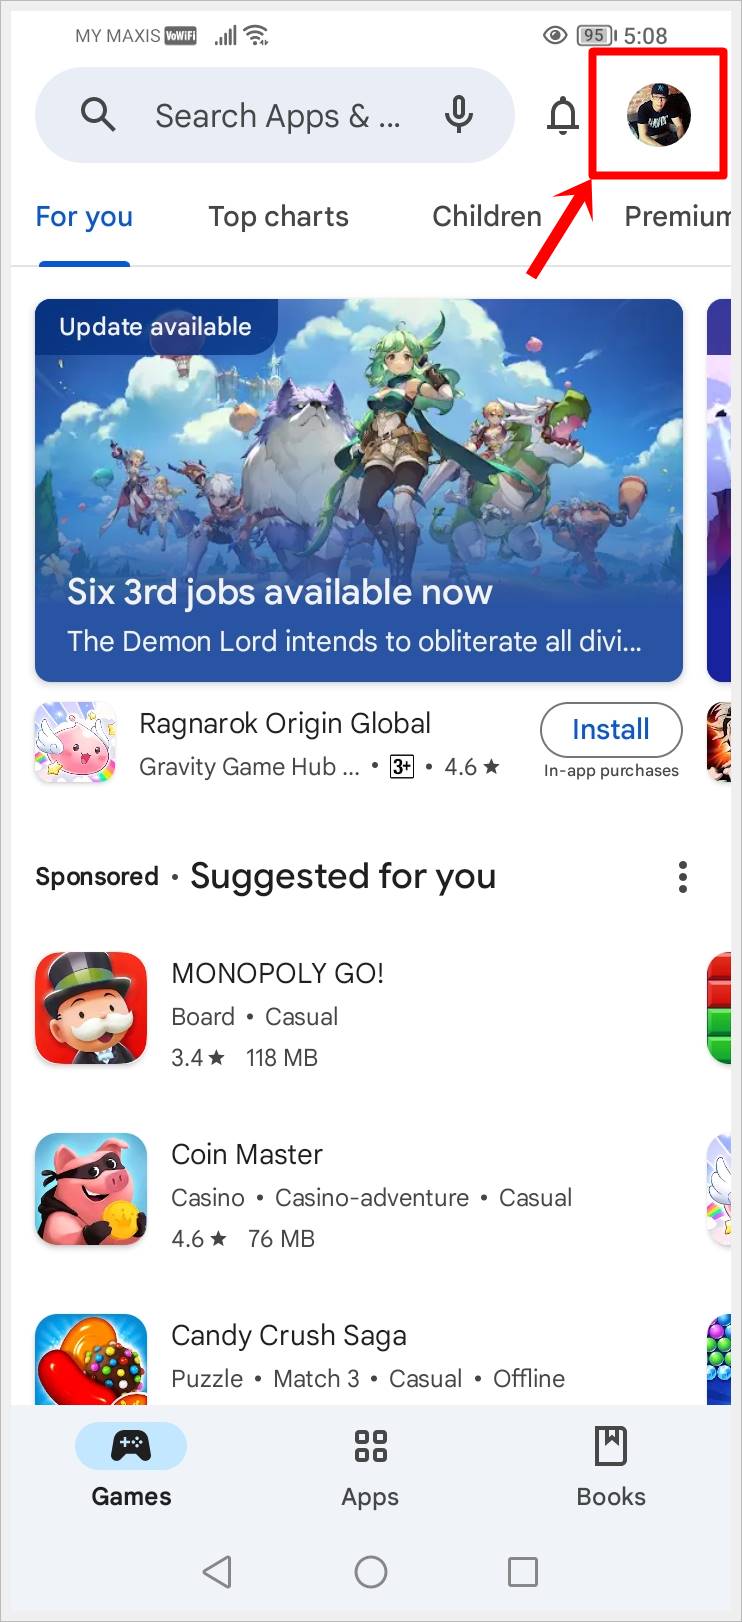
2. Go to Manage Apps and Device: Navigate to the “Manage apps and device” or similar option. This may vary slightly depending on your device.
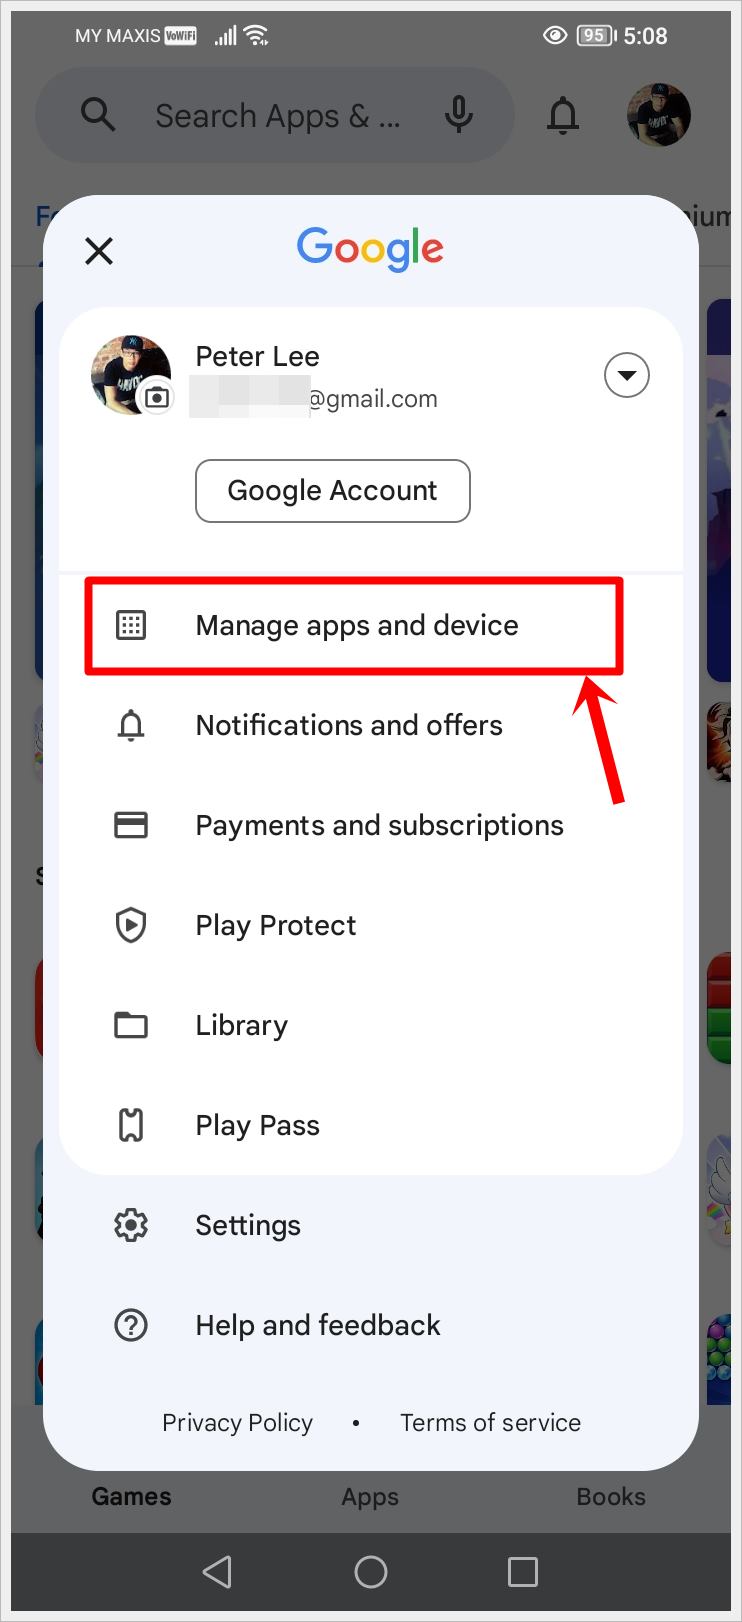
3. Check for Updates: Look for an option related to updates. In some devices, it might be “Updates available” or “Manage updates.”
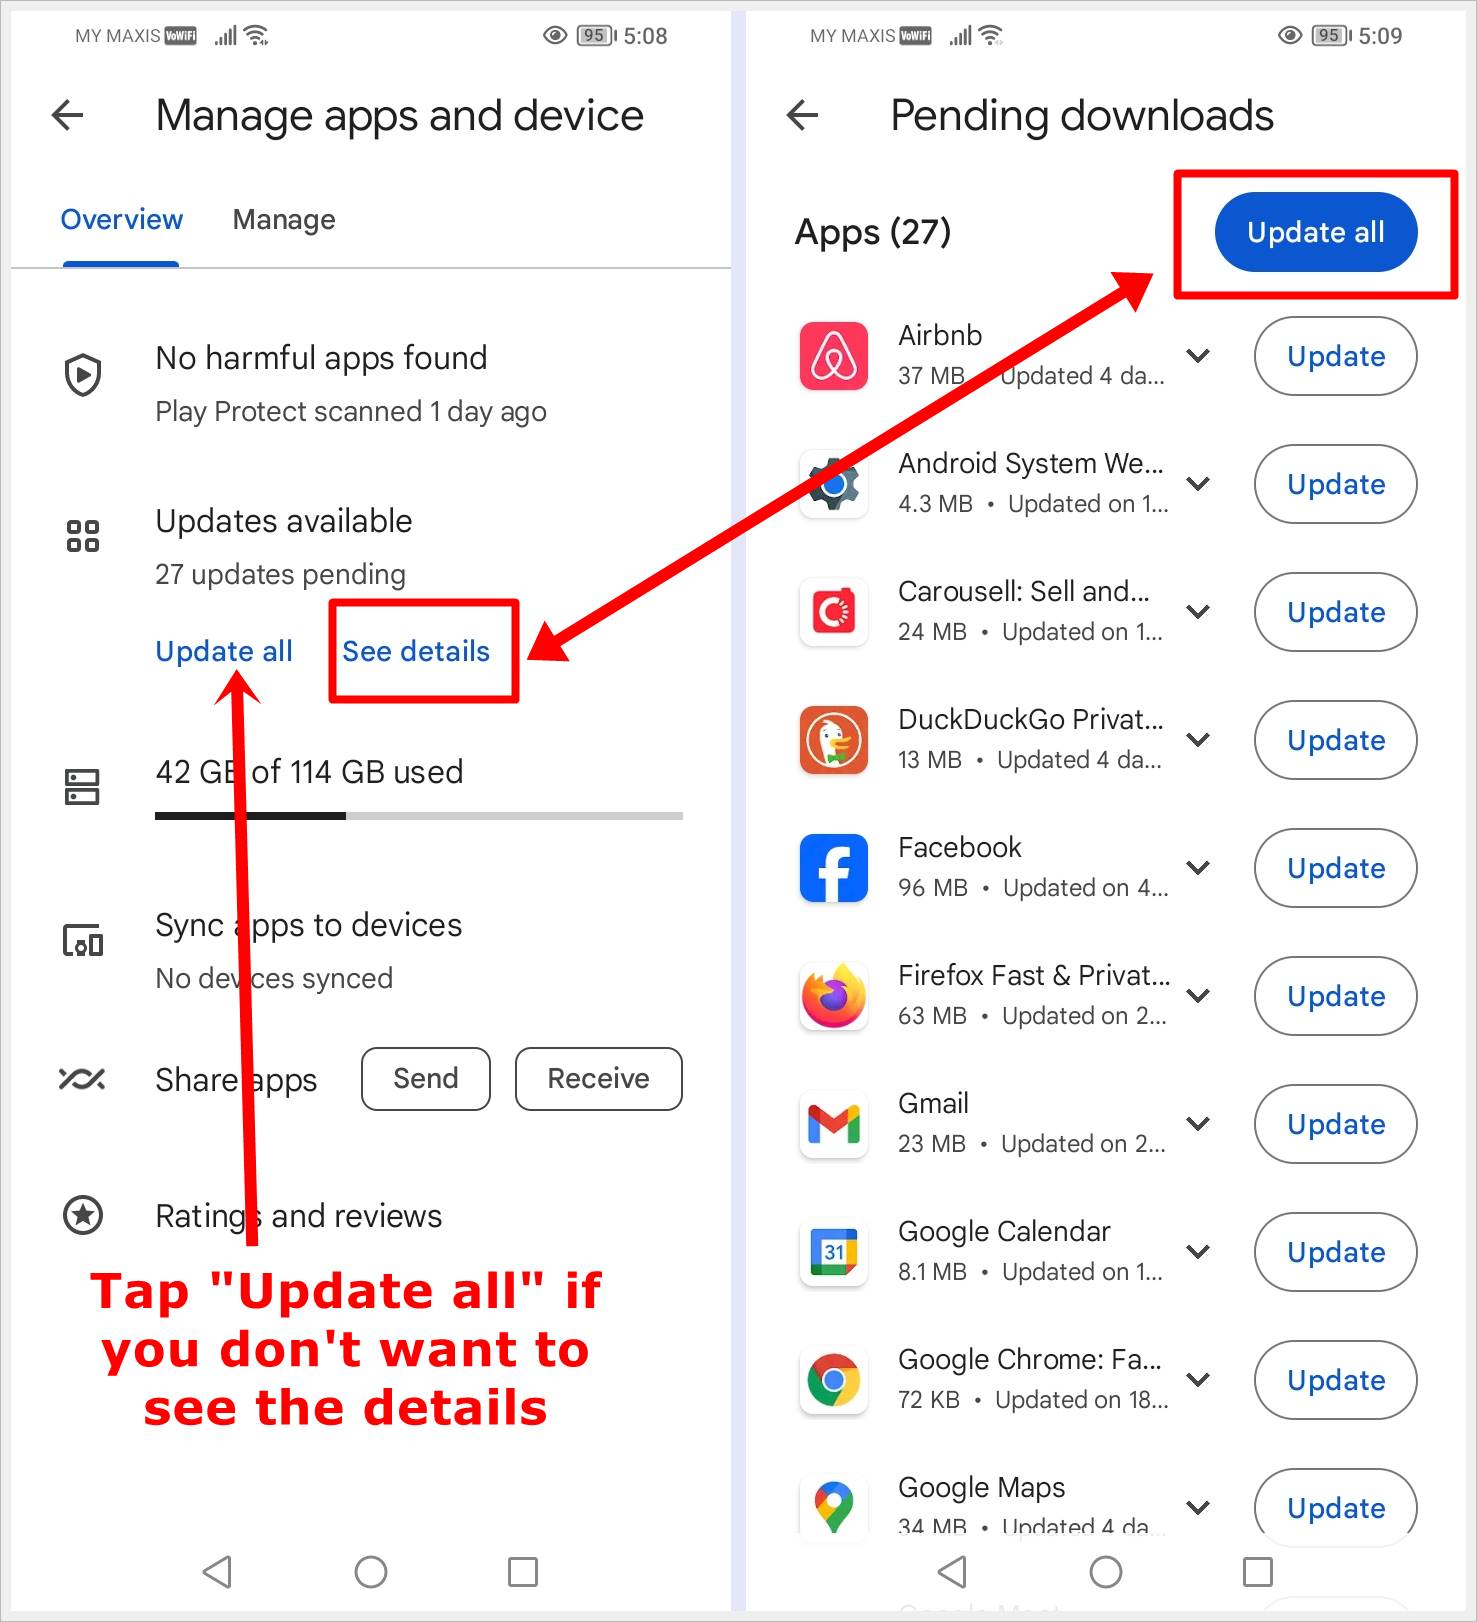
4. Update All Apps: Choose the option to ‘Update all’ apps. This ensures that Google Play Services and all other apps receive the latest updates available.
5. Wait for the Updates to Complete: Depending on your internet speed and the number of updates, it may take a few moments. Ensure your device is connected to Wi-Fi to expedite the process.
6. Restart Your Device: After the updates are complete, restart your Android device to apply the changes.
Note: In some cases, updates may be set to occur automatically. However, manually checking for updates ensures you have the latest versions promptly.
5. Reset App Preferences
Sometimes, conflicting app preferences can lead to the “Google Play Services Keeps Stopping” error. Resetting app preferences sets all app-related settings back to their default values, potentially resolving any conflicts that may be affecting Google Play Services.
Follow these steps to reset app preferences:
1. Open Settings: Launch the “Settings” app on your Android device.

2. Navigate to App Settings: Scroll down and find “Apps,” “Applications,” or “Application Manager” in the settings menu. Tap on it.

3. Access App Preferences: Look for the three-dot menu icon or a similar option in the top-right corner of the screen. Tap on it and select “Reset app preferences” or a similar option.
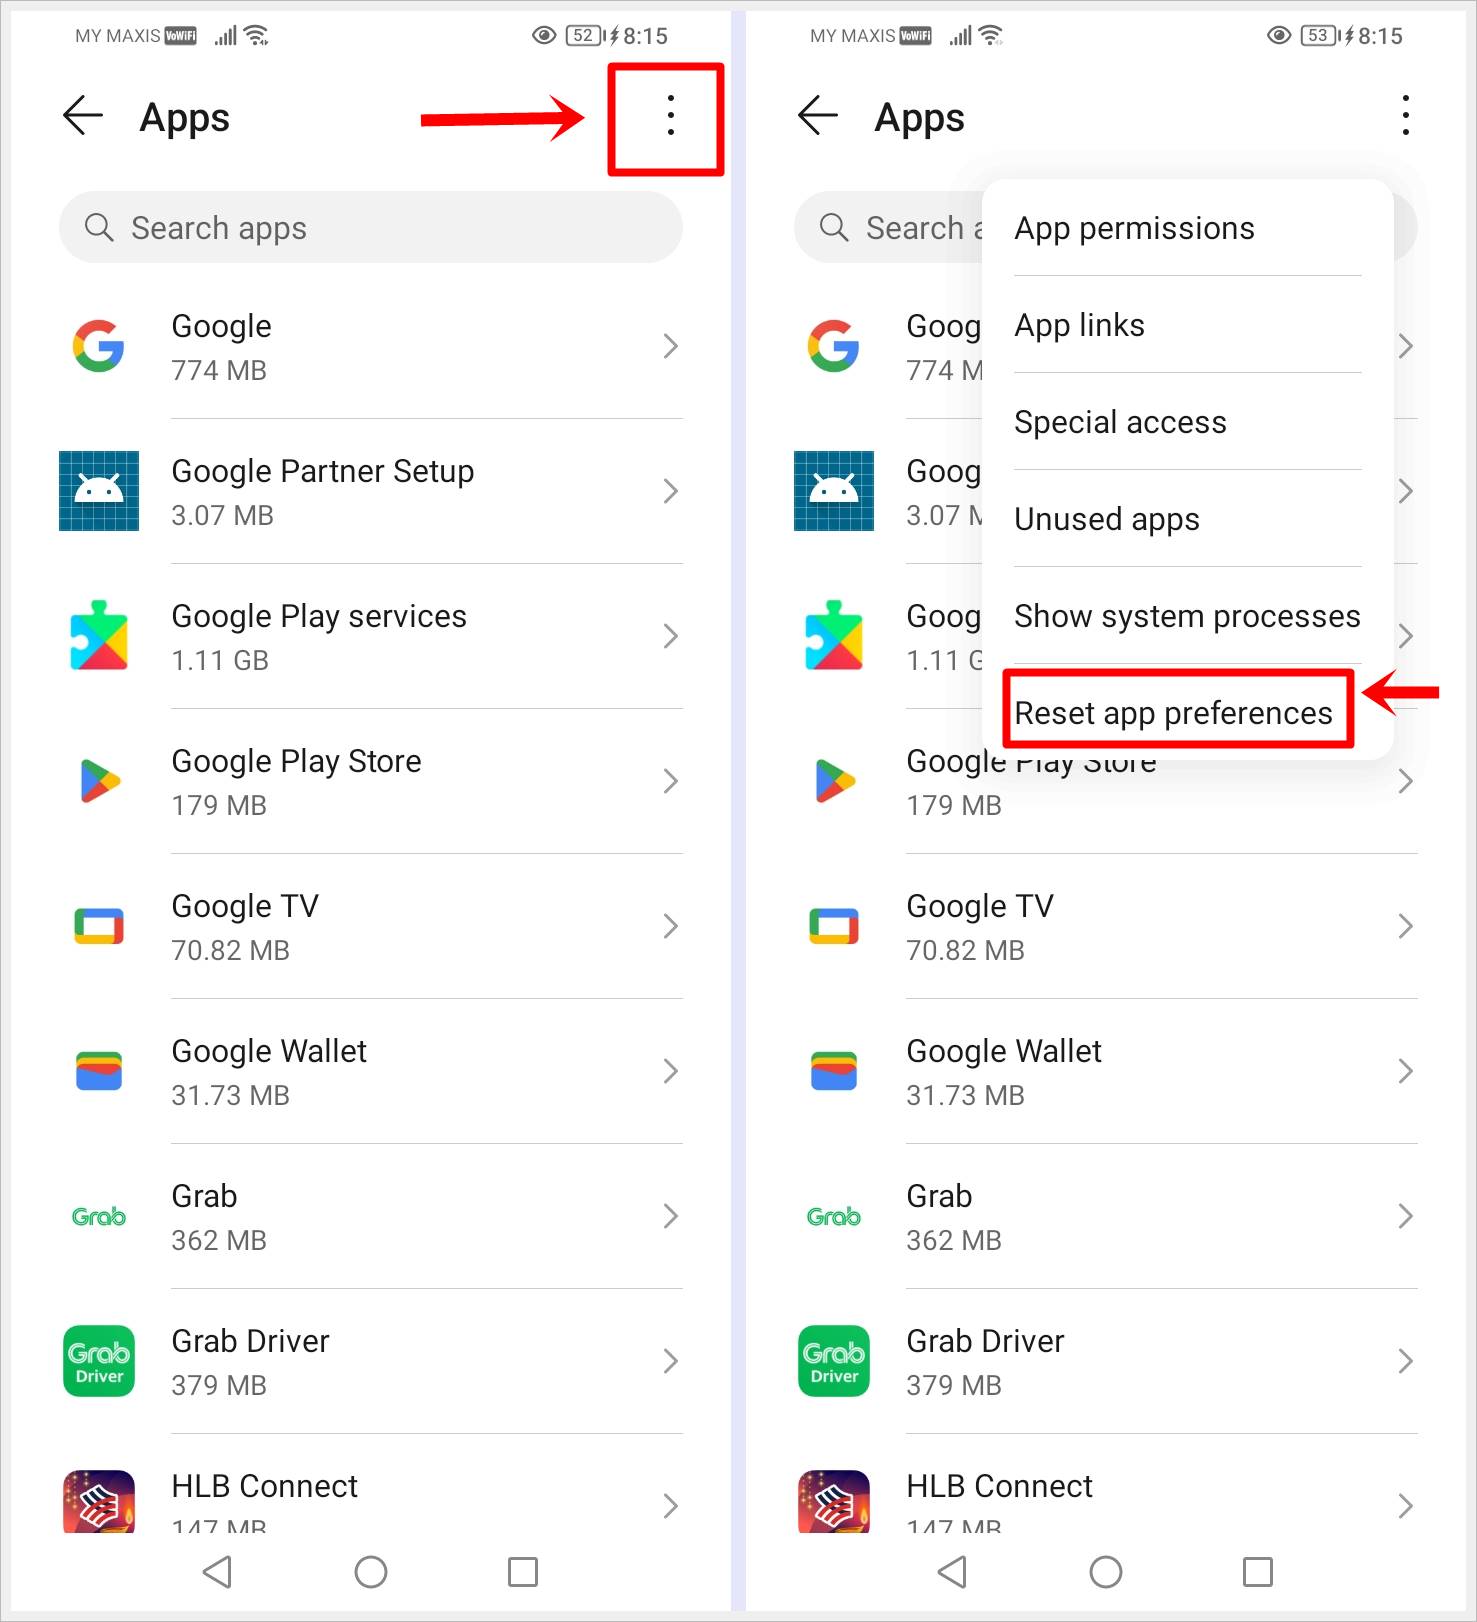
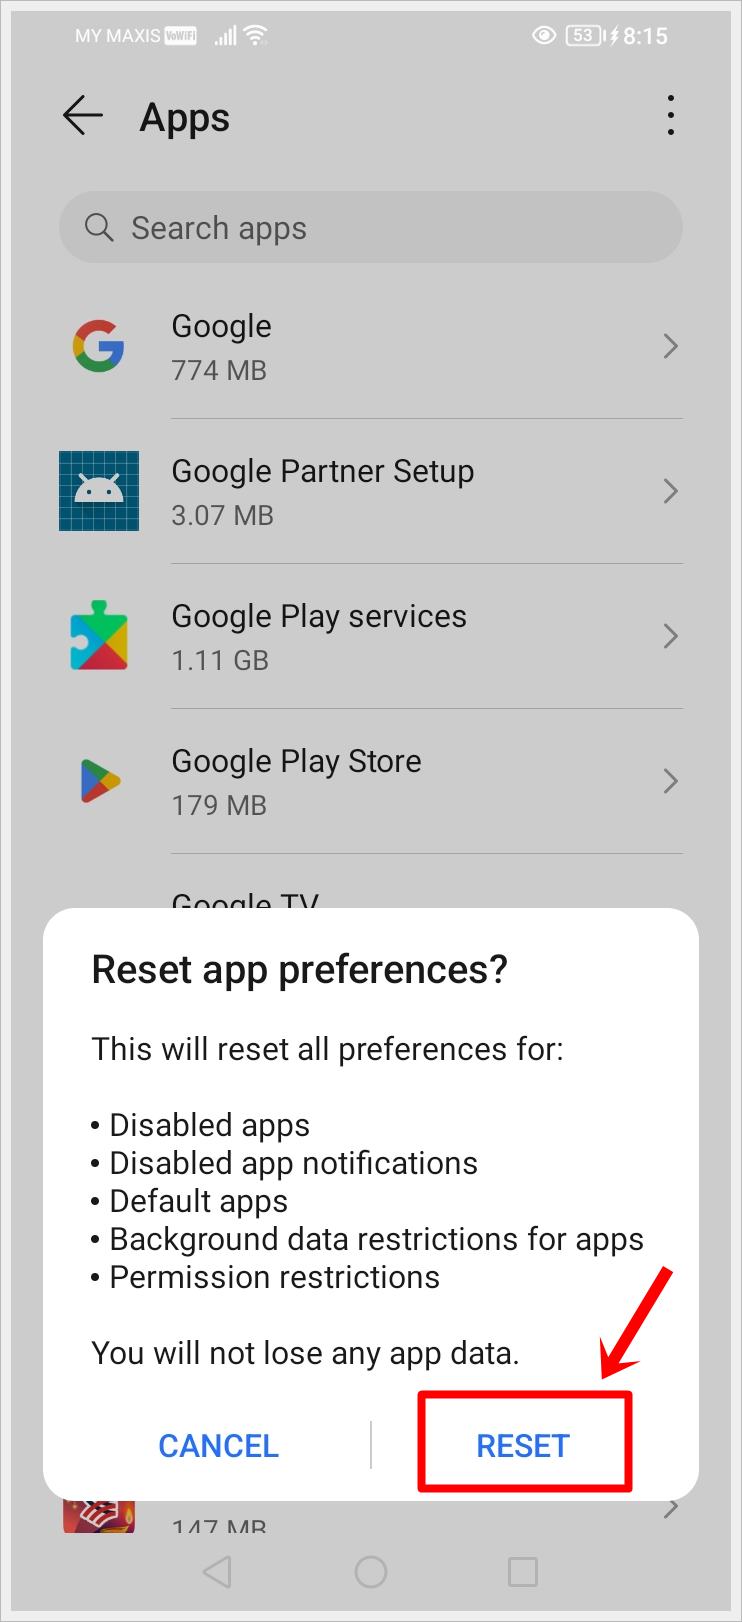
4. Confirm the Reset: You’ll likely receive a prompt informing you about the consequences of resetting app preferences. Confirm your action to proceed.
5. Restart Your Device: After resetting app preferences, restart your Android device.
Note: Resetting app preferences doesn’t delete your app data but may affect some app settings, such as default apps, background data restrictions, and permission restrictions.
6. Uninstall Updates
Updates, while essential for the overall health of your apps, can sometimes introduce bugs or compatibility issues. If you’re facing the “Google Play Services Keeps Stopping” error, uninstalling updates can revert the app to its factory version and potentially fix the issue. This step is not about keeping your app outdated; rather, it’s a strategic move to clear any issues introduced by recent updates.
Follow these steps to uninstall updates:
1. Open Settings: Access the “Settings” app on your Android device.

2. Navigate to App Settings: Scroll down and locate “Apps,” “Applications,” or “Application Manager” in the settings menu. Tap on it.

3. Find Google Play Services: Look for “Google Play Services” in the list of apps. Once found, tap on it.

4. Uninstall Updates: Depending on your phone model, the location of the “Uninstall Updates” option may vary. Once you find it, tap on “Uninstall Updates.”
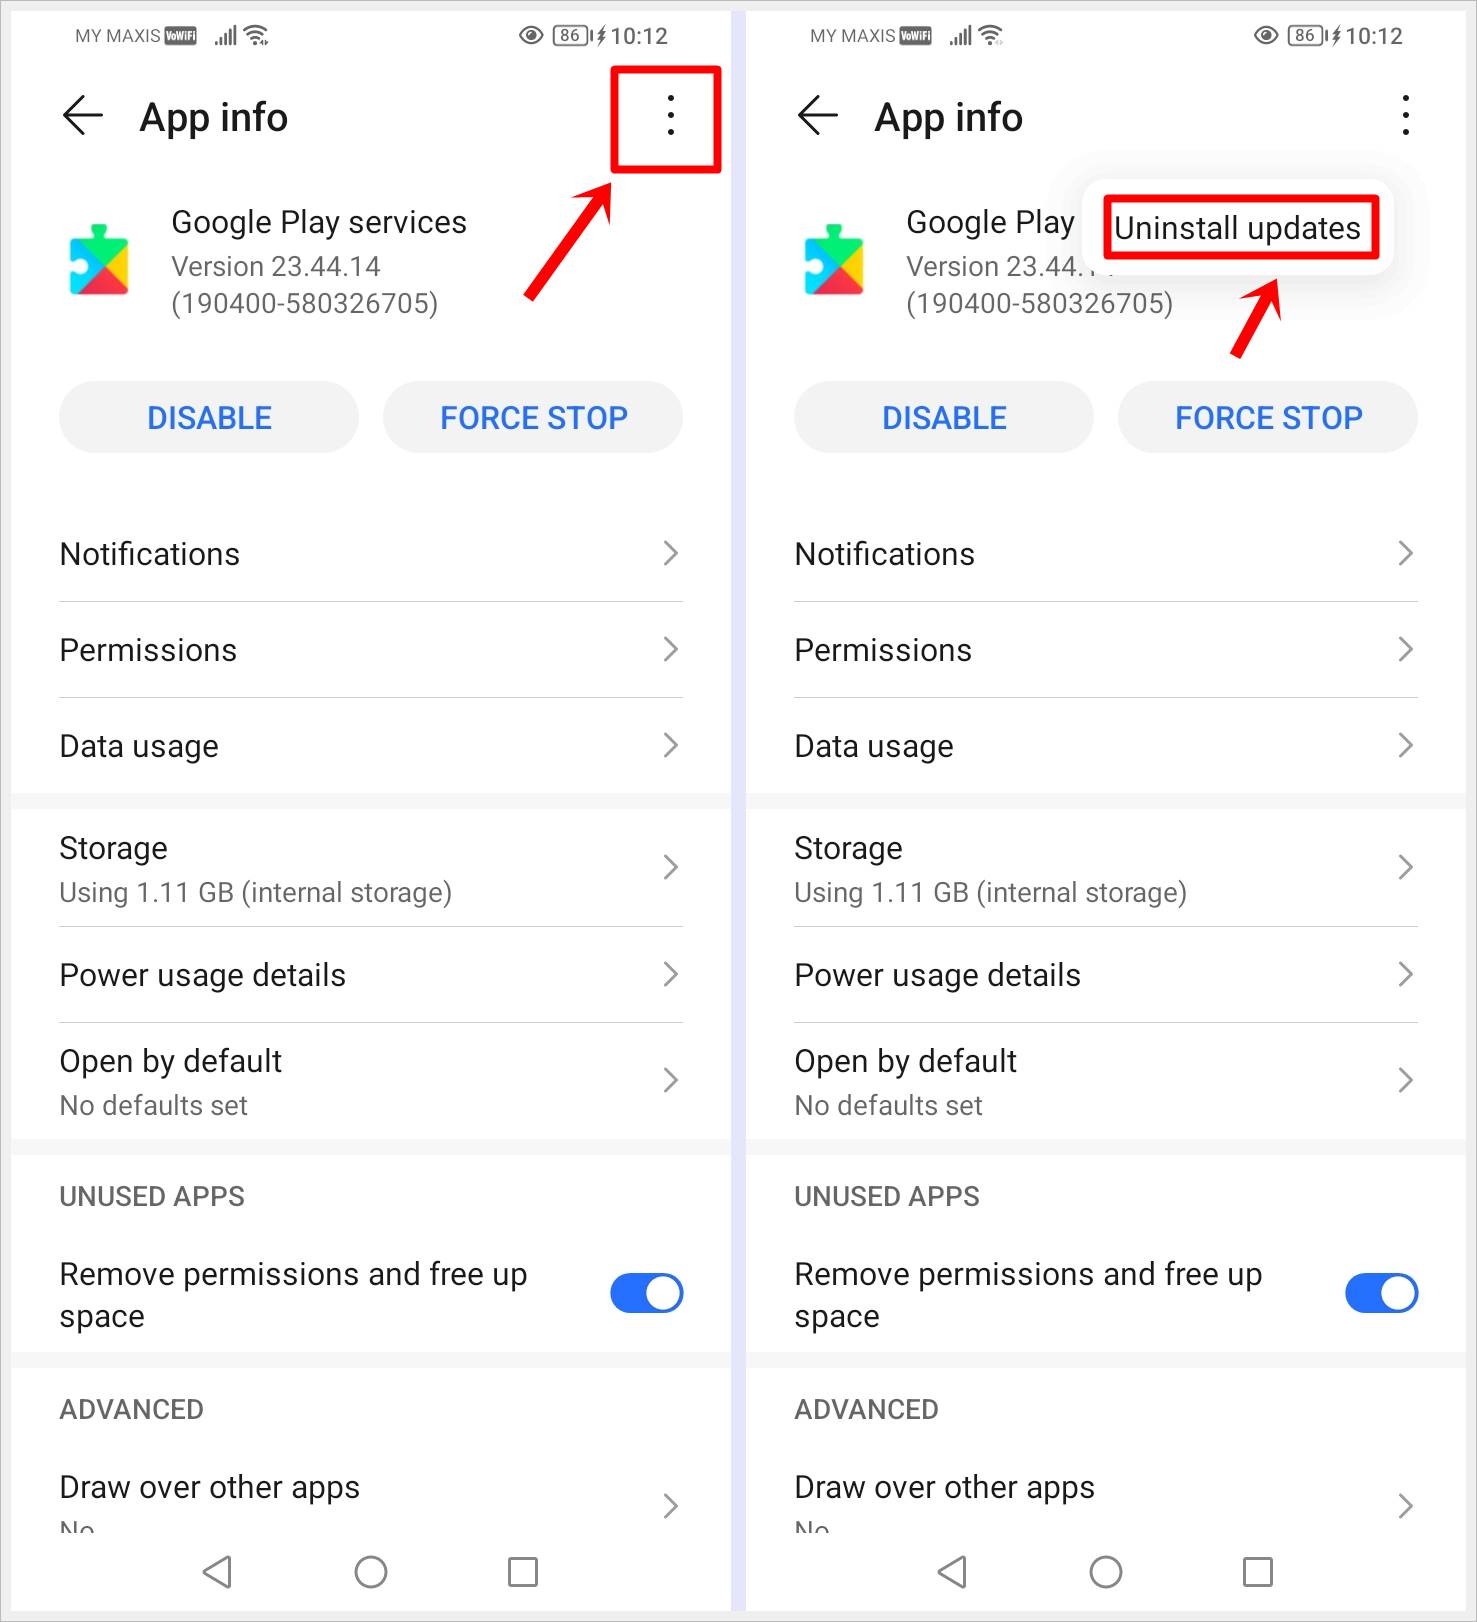
5. Confirm Your Action: Confirm the uninstallation of updates if prompted.
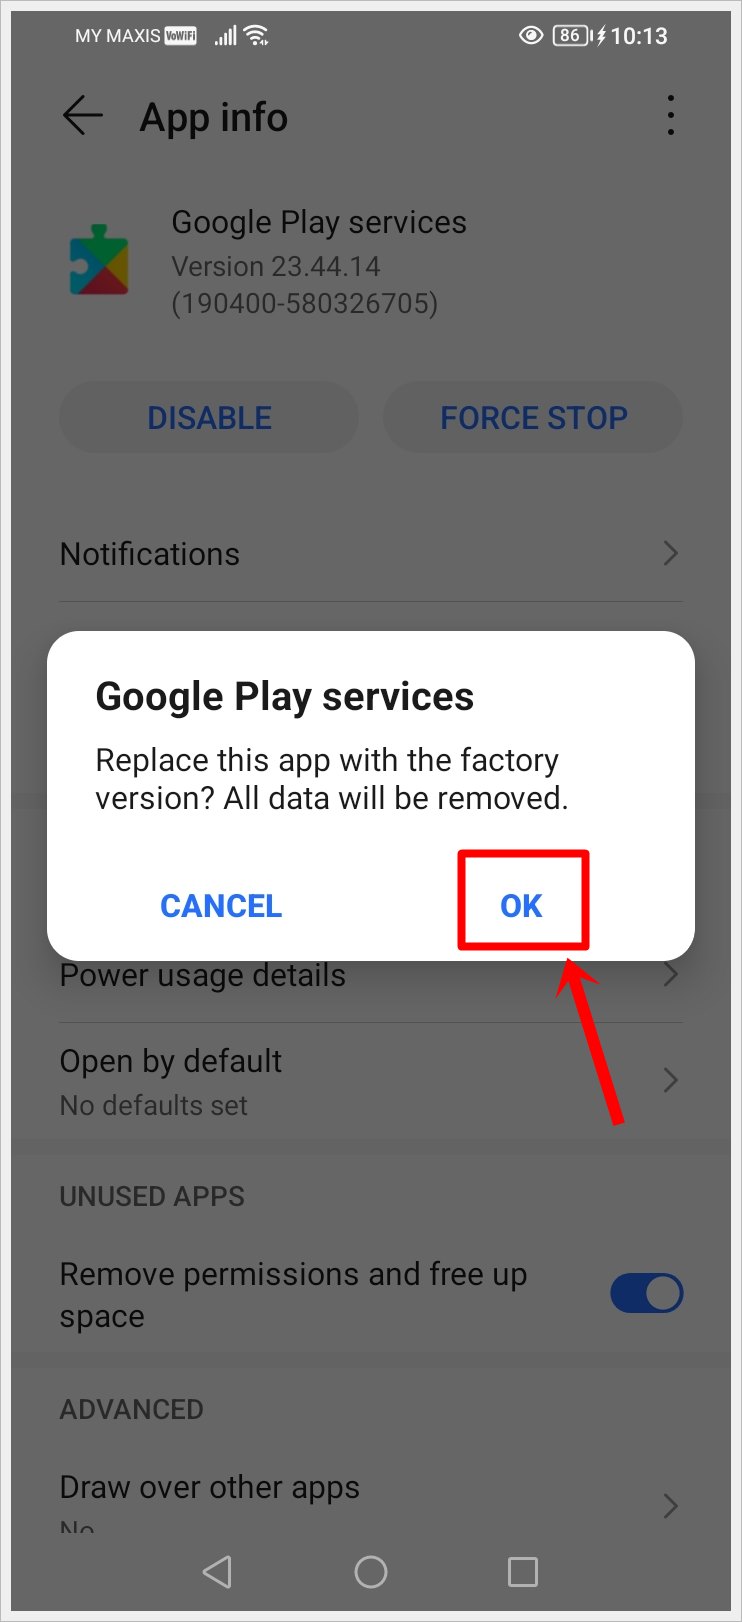
6. Restart Your Device: After uninstalling updates, restart your Android device.
Note: Google Play Services will automatically update itself to the latest version after you restart your device. This step is a temporary measure to address potential issues introduced by recent updates.
7. Check Date and Time Settings
Accurate date and time settings are critical for the proper functioning of various services on your Android device, including Google Play Services. If your device’s date and time are incorrect, it can lead to synchronization issues and potentially trigger the “Google Play Services Keeps Stopping” error. Verifying and adjusting these settings ensures that Google Play Services operates seamlessly.
Follow these steps to check the date and time settings:
1. Open Settings: Launch the “Settings” app on your Android device.

2. Navigate to Date & Time Settings: Depending on your phone model, the location of the “Date & Time” option may vary. Once you find it, tap on “Date & Time” or a similar option in the settings menu.
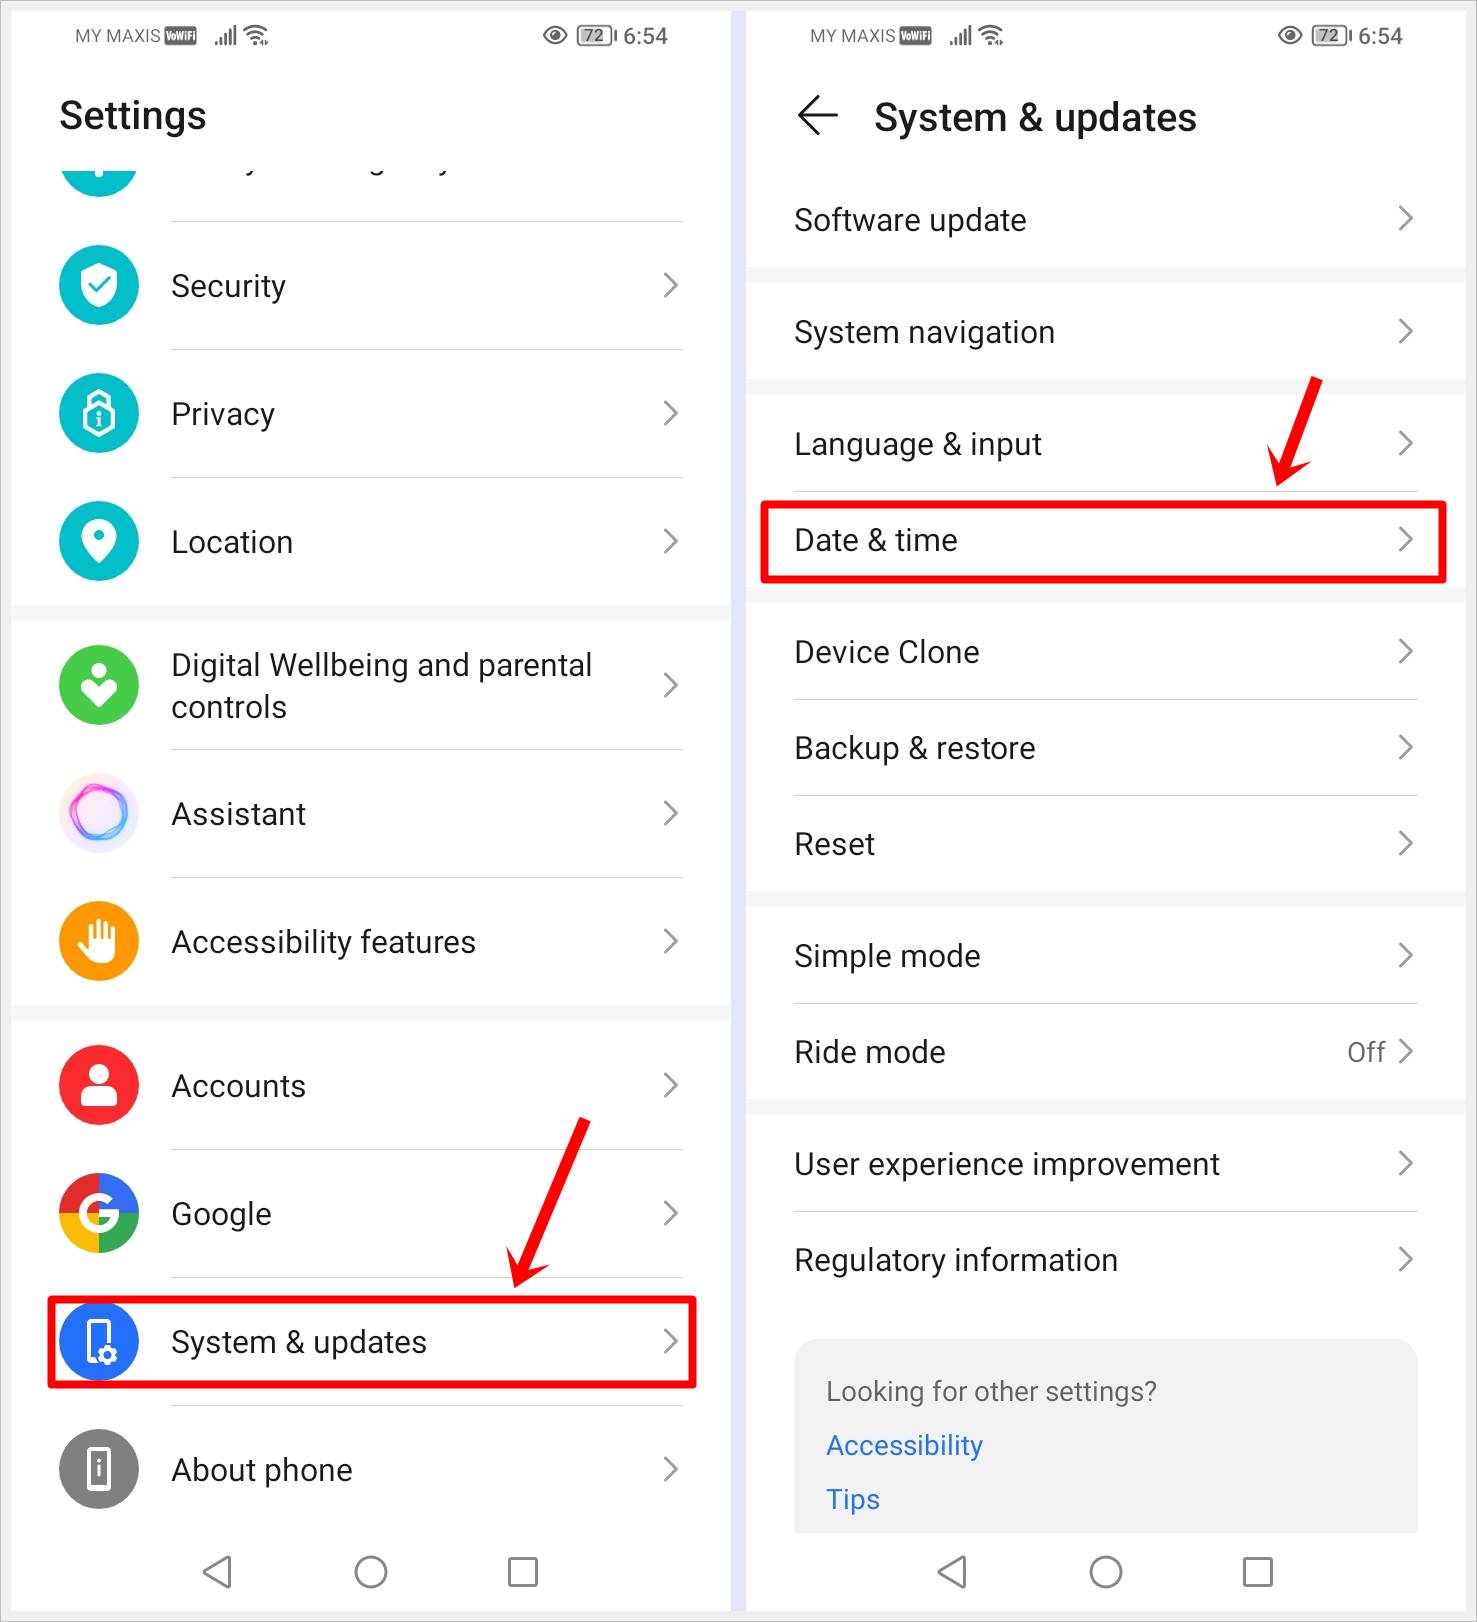
3. Enable Automatic Date, Time and Time Zone: If it’s not already enabled, toggle on the “Automatic Date, Time and Time Zone” option. This ensures that your device syncs with the network-provided date and time, and adjusts its time zone based on your location.
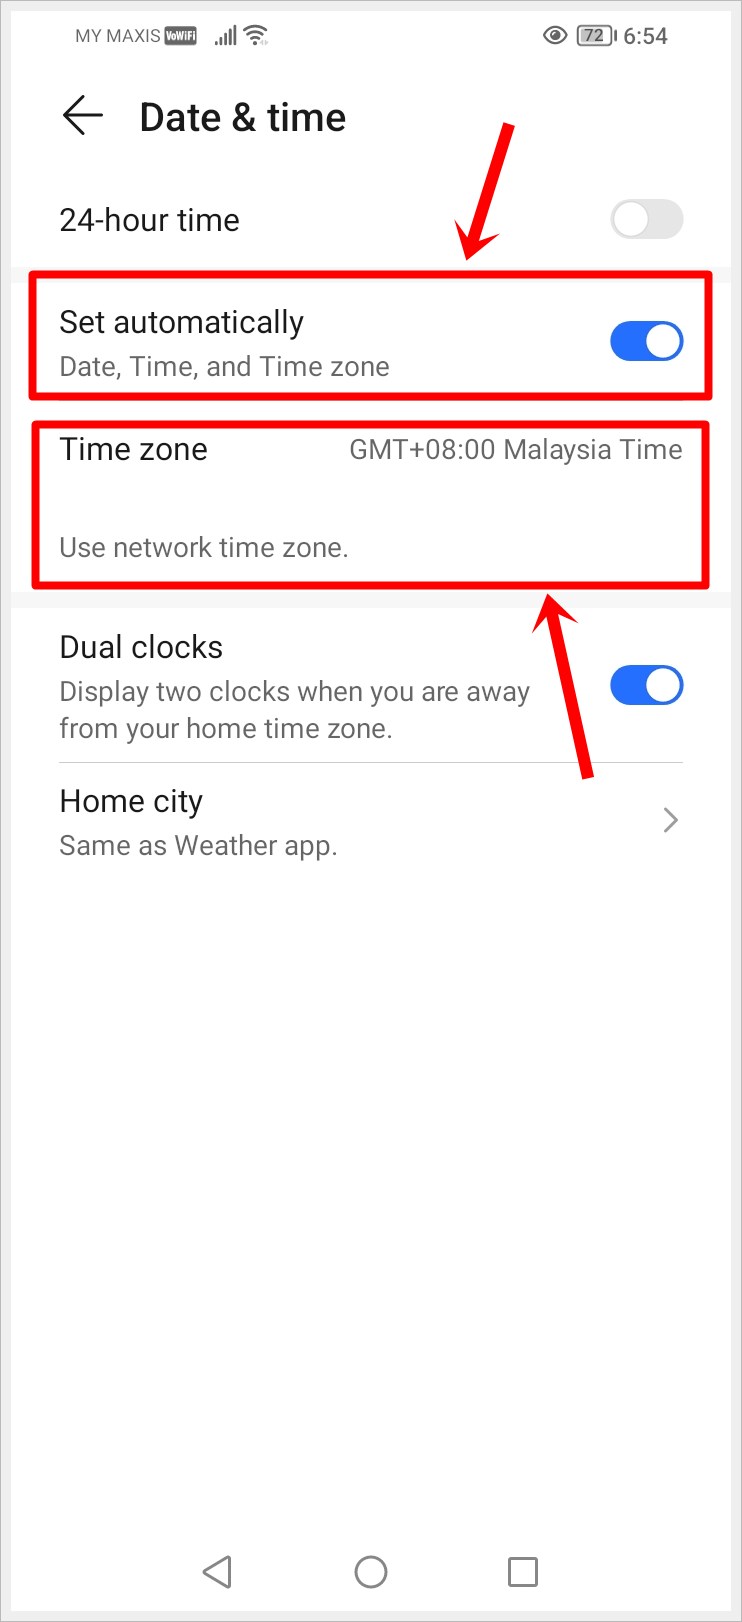
4. Restart Your Device: After adjusting date and time settings, restart your Android device to apply the changes.
8. Disable and Re-enable Google Play Services
Disabling and re-enabling Google Play Services can be a simple yet effective method to refresh its operation. This process essentially ‘restarts’ the service, potentially able to fix any temporary glitches or hiccups that might be causing the “Google Play Services Keeps Stopping” error. It’s akin to turning something off and on again to ensure a clean start.
Here’s how to disable and re-enable Google Play Services:
1. Open Settings: Navigate to the “Settings” app on your Android device.

2. Access App Settings: Scroll down and find “Apps,” “Applications,” or “Application Manager” in the settings menu. Tap on it.

3. Locate Google Play Services: Search for “Google Play Services” in the list of apps. Once found, tap on it to access the app settings.

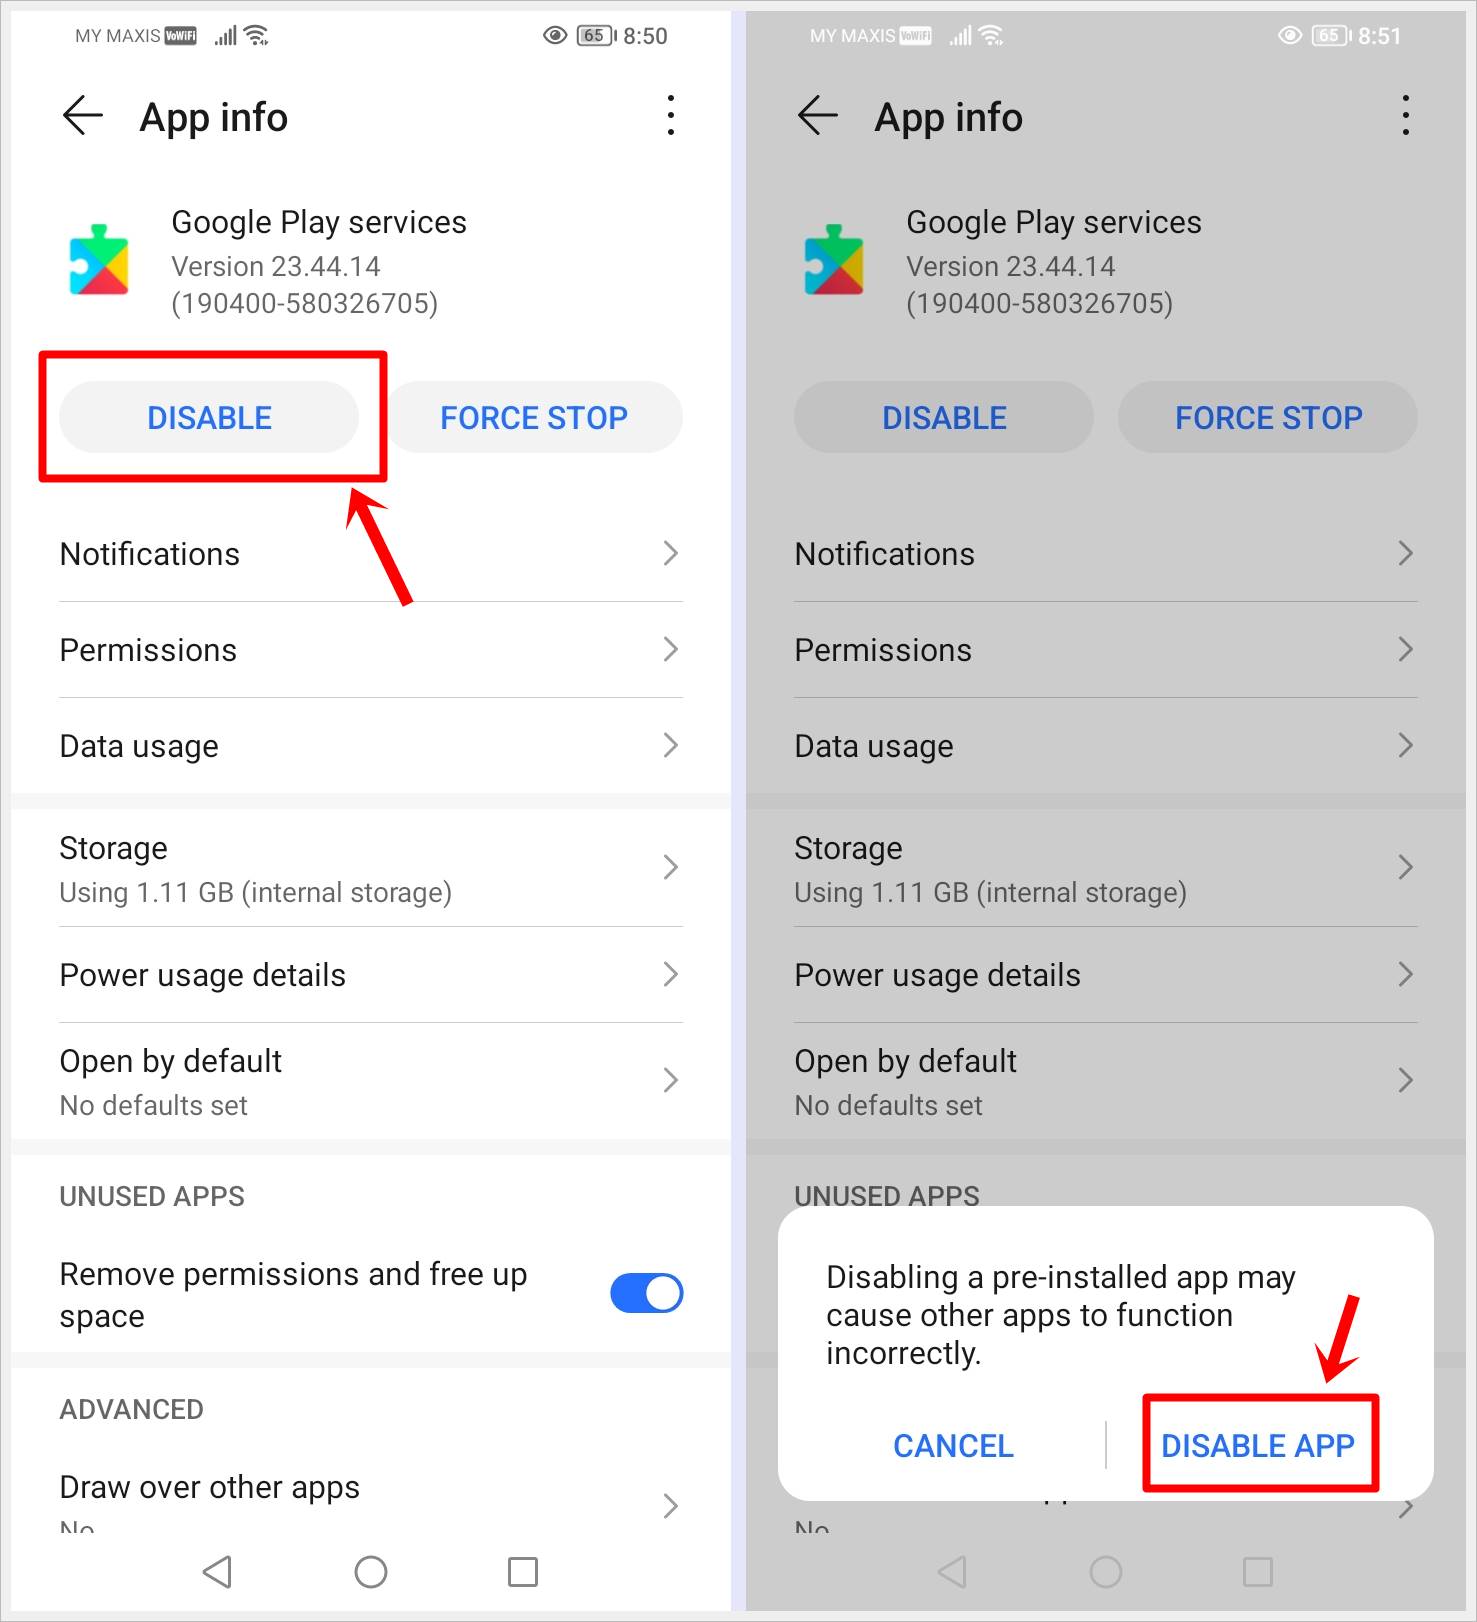
4. Disable Google Play Services: On the App info page, you’ll see an option to disable Google Play Services. Tap on “Disable,” followed by “DISABLE APP” to confirm. Note that this may temporarily affect some functionalities.
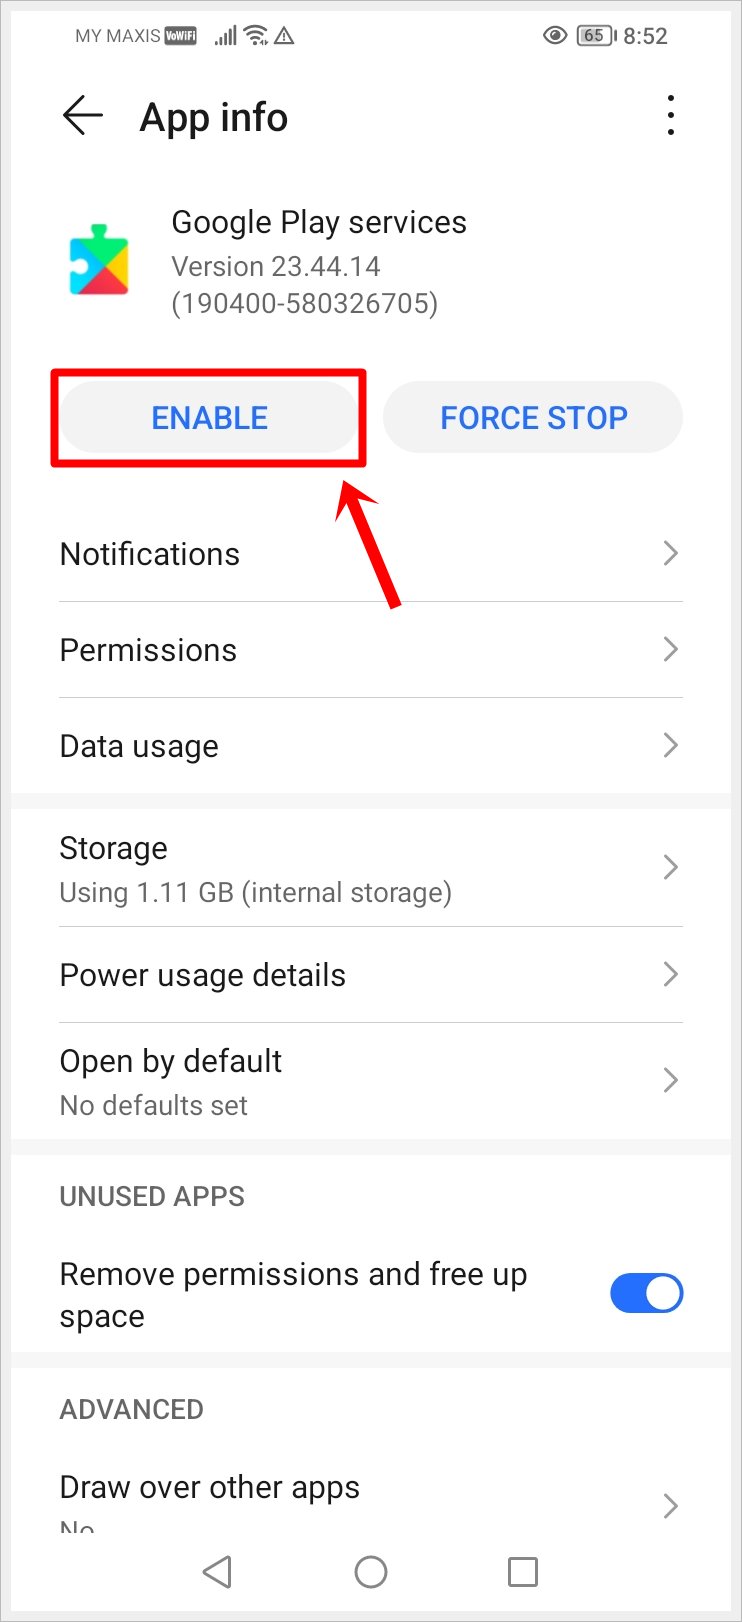
5. Re-enable Google Play Services: After disabling, you’ll notice that the option changes to “Enable” or “Enable Updates.” Tap on it to re-enable Google Play Services.
6. Restart Your Device: Following the re-enabling process, restart your Android device.
9. Remove and Re-add Google Account
Your Google account is tightly integrated into the functionality of Google Play Services. If there’s a hiccup in the account synchronization, it can lead to errors like “Google Play Services Keeps Stopping.” Removing and re-adding your Google account can reestablish the connection, potentially resolving the issue and restoring seamless operation.
Follow these steps to remove and re-add your Google account:
1. Open Settings: Access the “Settings” app on your Android device.

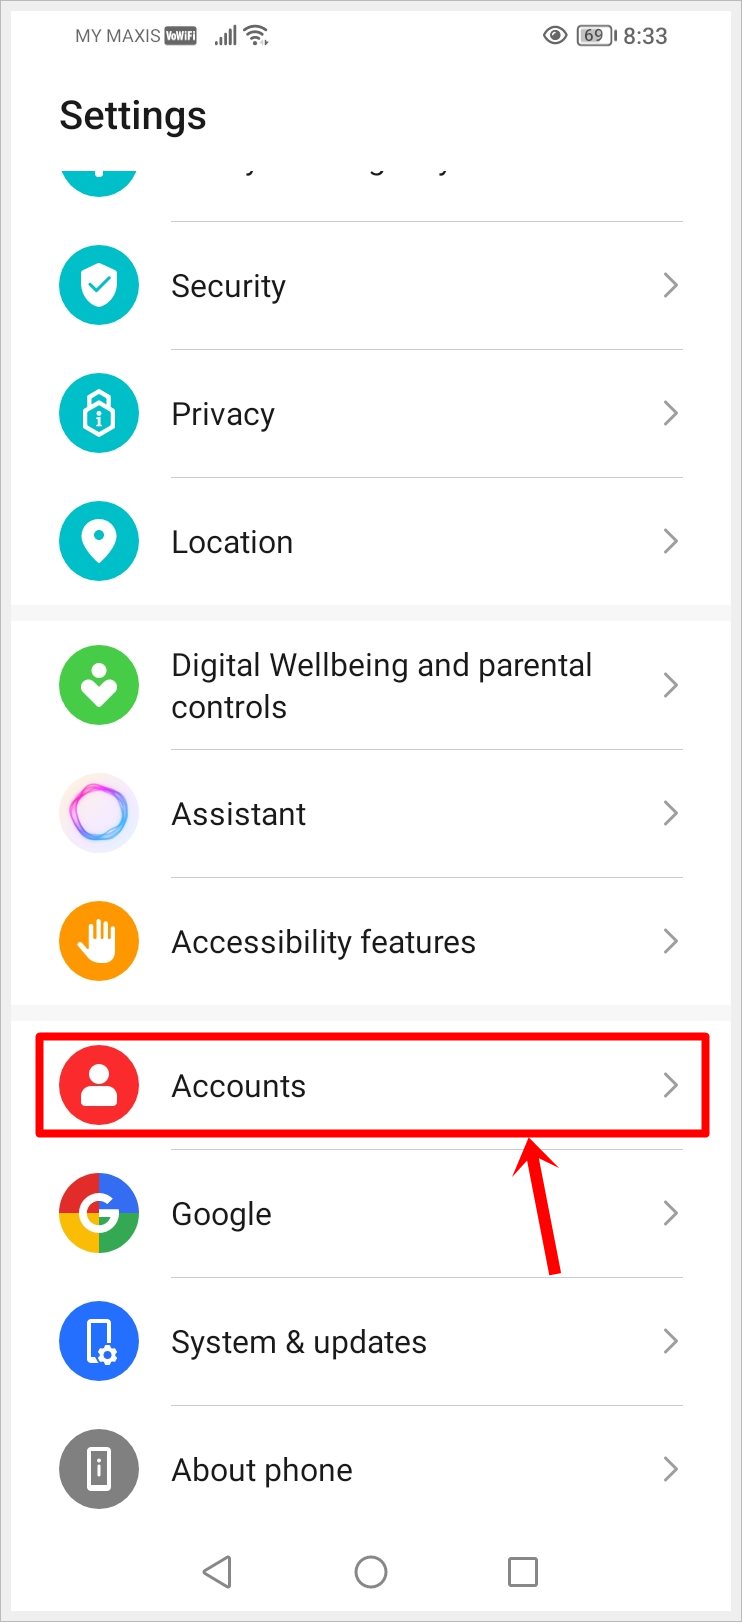
2. Navigate to Accounts: Look for the “Accounts,” “Users & accounts,” or “Cloud and accounts” option in the settings menu. Tap on it.
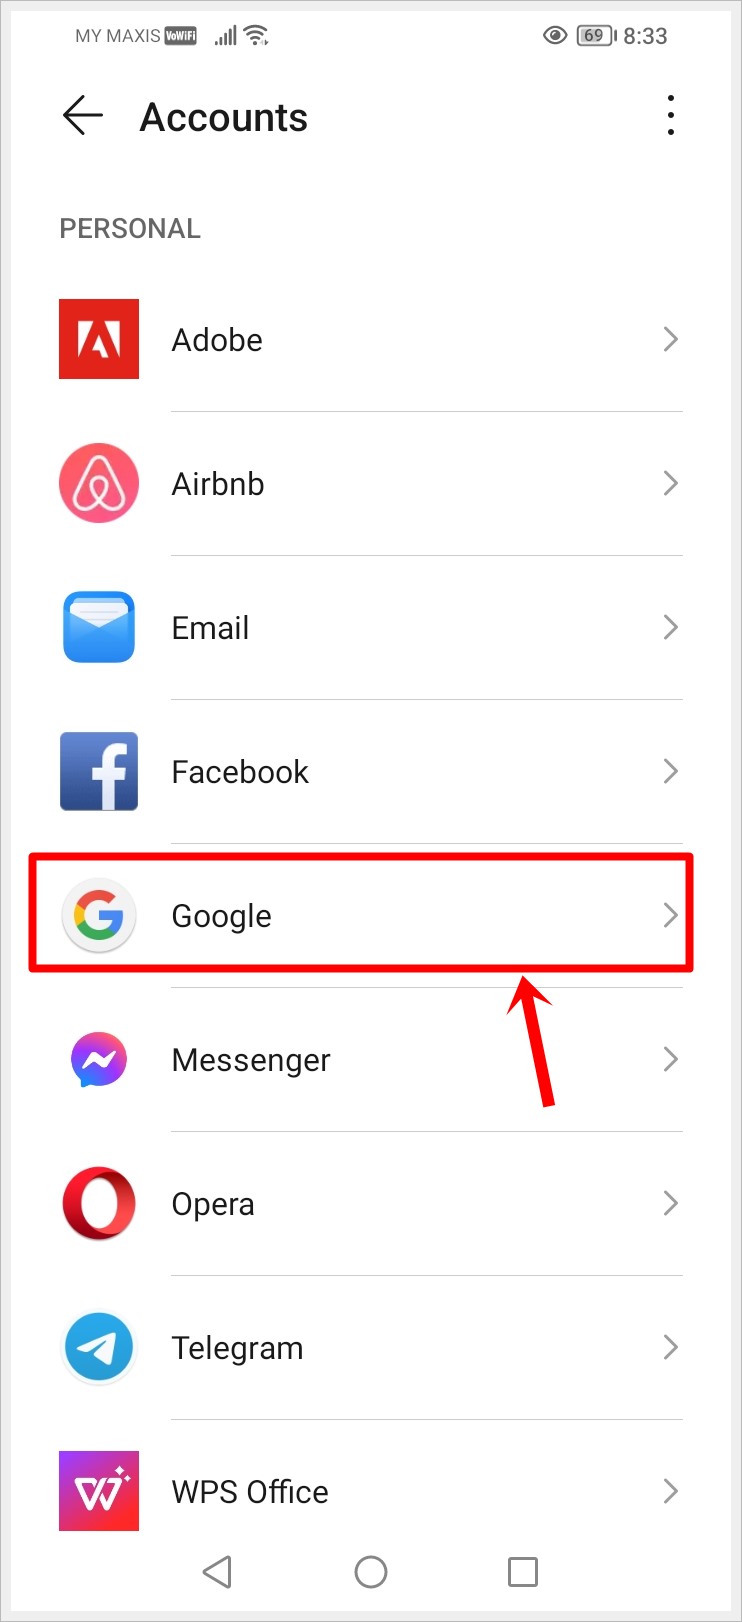
3. Select Google Account: Locate and tap on your Google account. This might be listed under “Accounts” or “Google,” depending on your device.
4. Remove Account: Once in your Google account settings, look for the option to remove or delete the account. Tap on it and confirm your action if prompted.
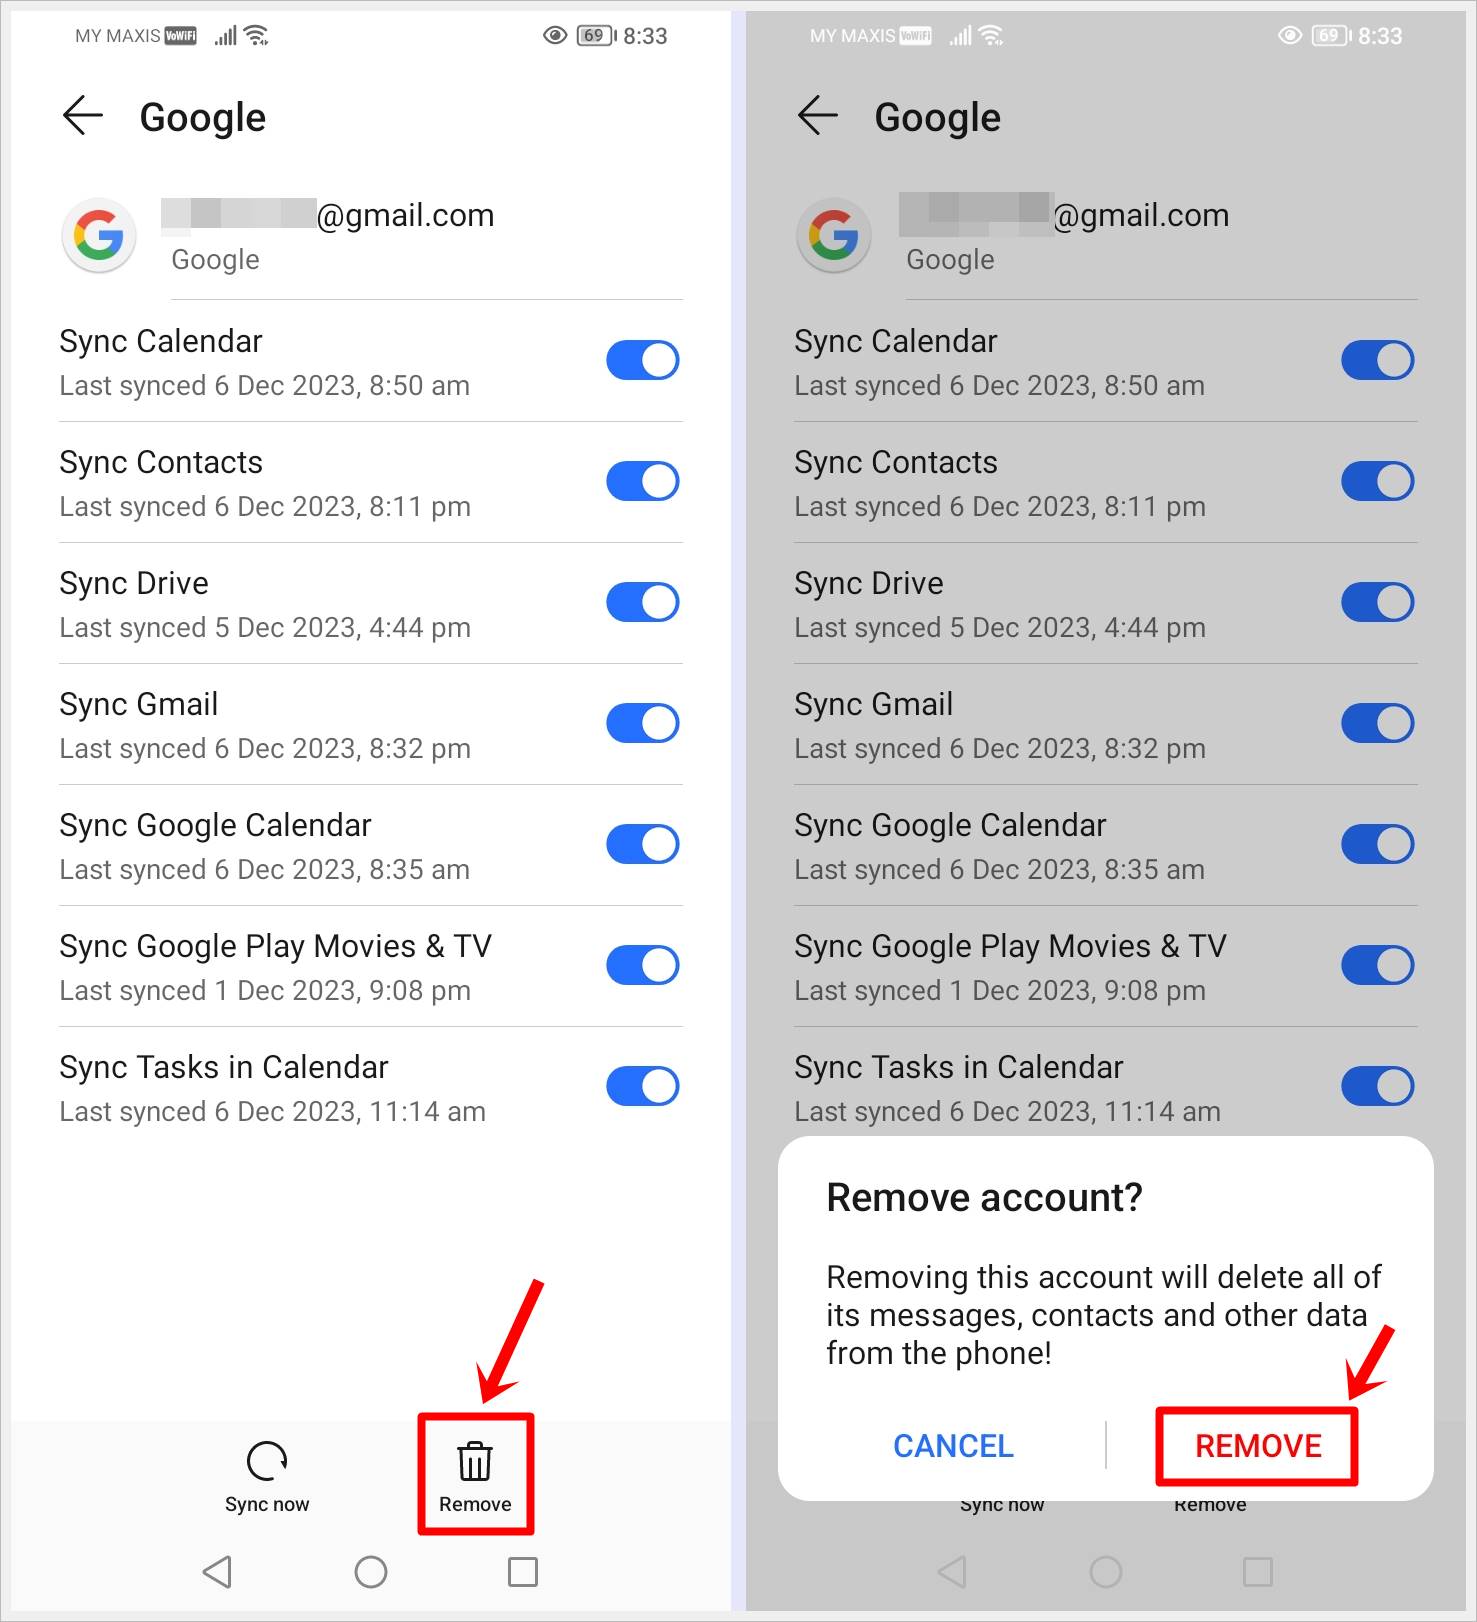
5. Restart Your Device: After removing the account, restart your Android device.
6. Add Google Account: Return to the “Accounts” section in settings, tap on “Add account” or “Google,” and follow the prompts to re-add your Google account.
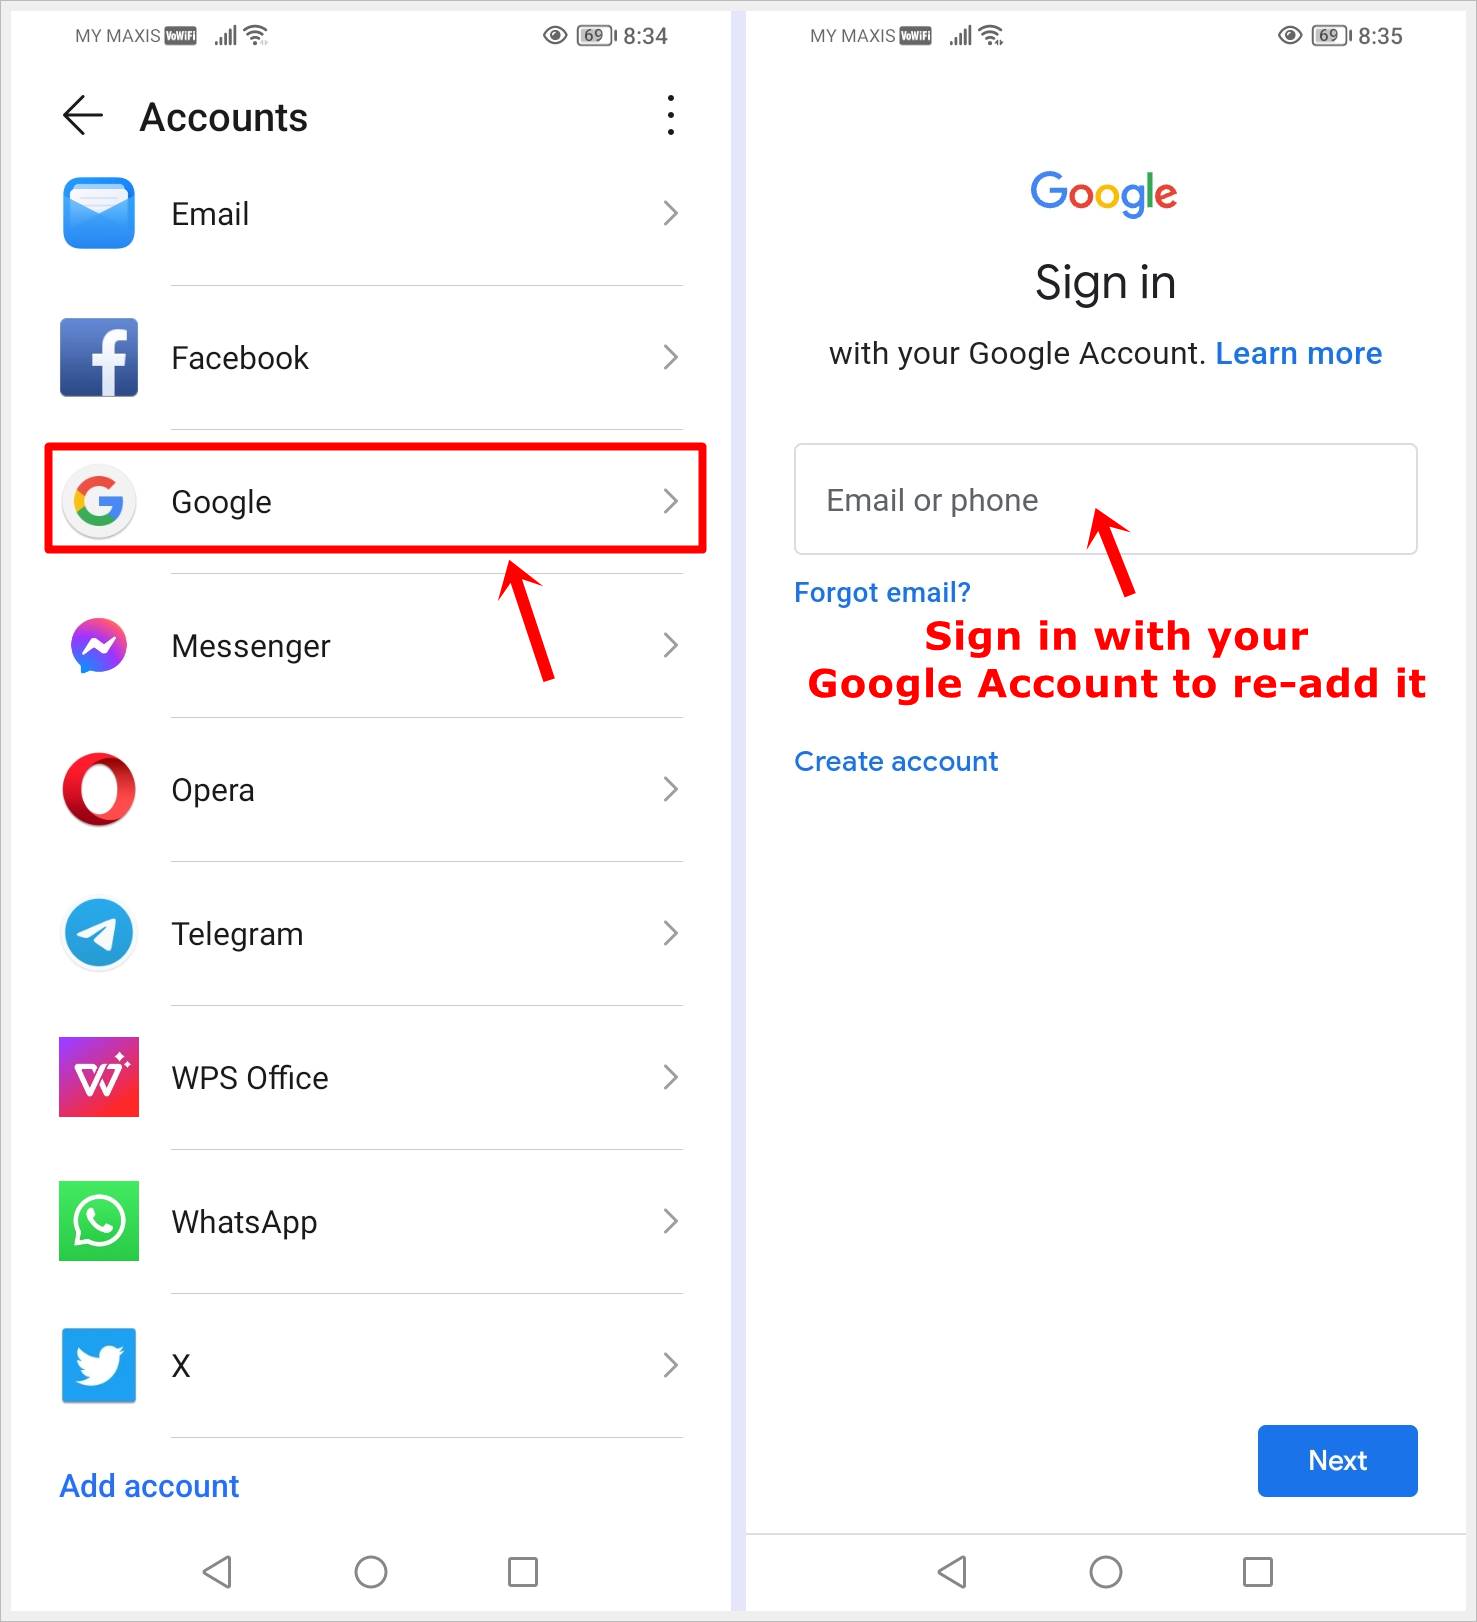
7. Sync Account: Ensure that you allow your Google account to sync during the re-addition process.
8. Restart Your Device Again: After re-adding your account, restart your device once more.
10. Grant the Required Permissions
Google Play Services requires certain permissions to function correctly and interact with other apps on your device. If these permissions are not granted or have been inadvertently revoked, it can lead to the “Google Play Services Keeps Stopping” error. Verifying and granting the necessary permissions ensures that Google Play Services can perform its tasks without interruptions.
Here’s how to grant the required permissions to Google Play Services:
1. Open Settings: Access the “Settings” app on your Android device.

2. Navigate to App Settings: Scroll down and locate “Apps,” “Applications,” or “Application Manager” in the settings menu. Tap on it.

3. Locate Google Play Services: Search for “Google Play Services” in the list of apps. Once found, tap on it to access the app settings.

4. Check App Permissions:
- Within the Google Play Services app settings, look for an option related to “Permissions” or “App permissions.”
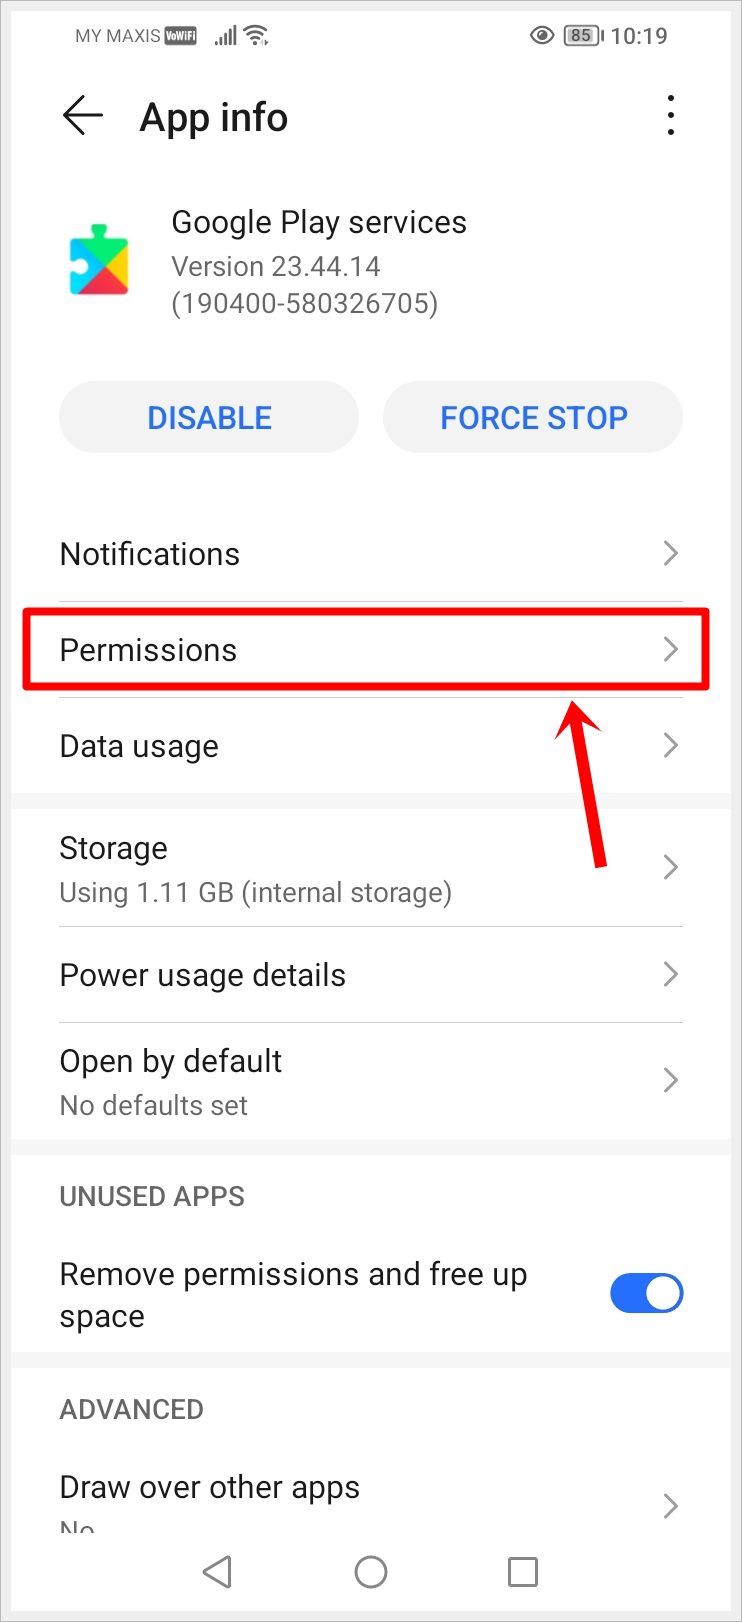
- Review the permissions and ensure that necessary permissions like Location, Contacts, Storage, and others are granted.
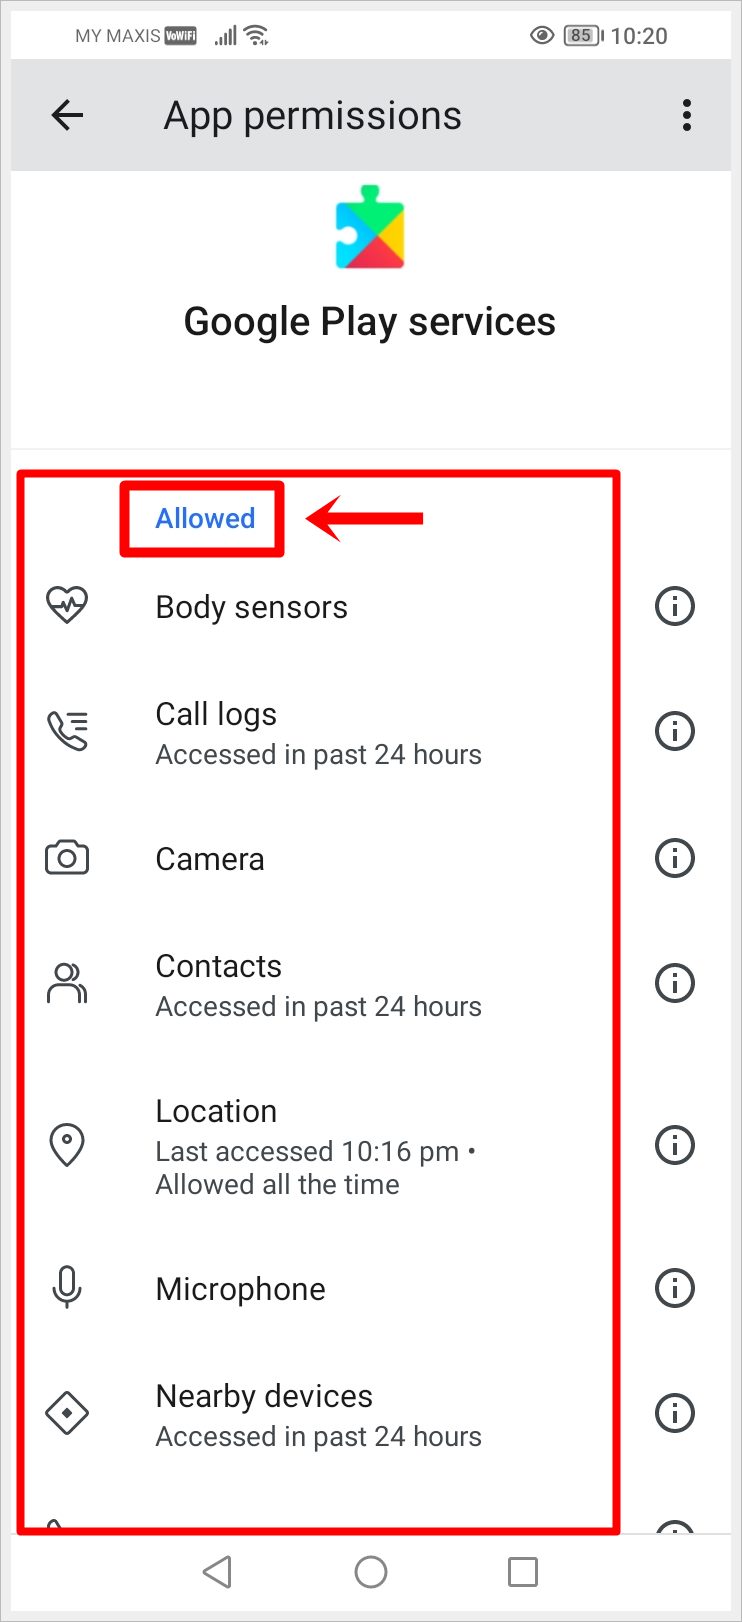
5. Grant Missing Permissions: Scroll down and look for the “Not allowed” section. If any permissions are not granted, tap on the respective option and grant the necessary permissions. Make sure nothing is denied permission.
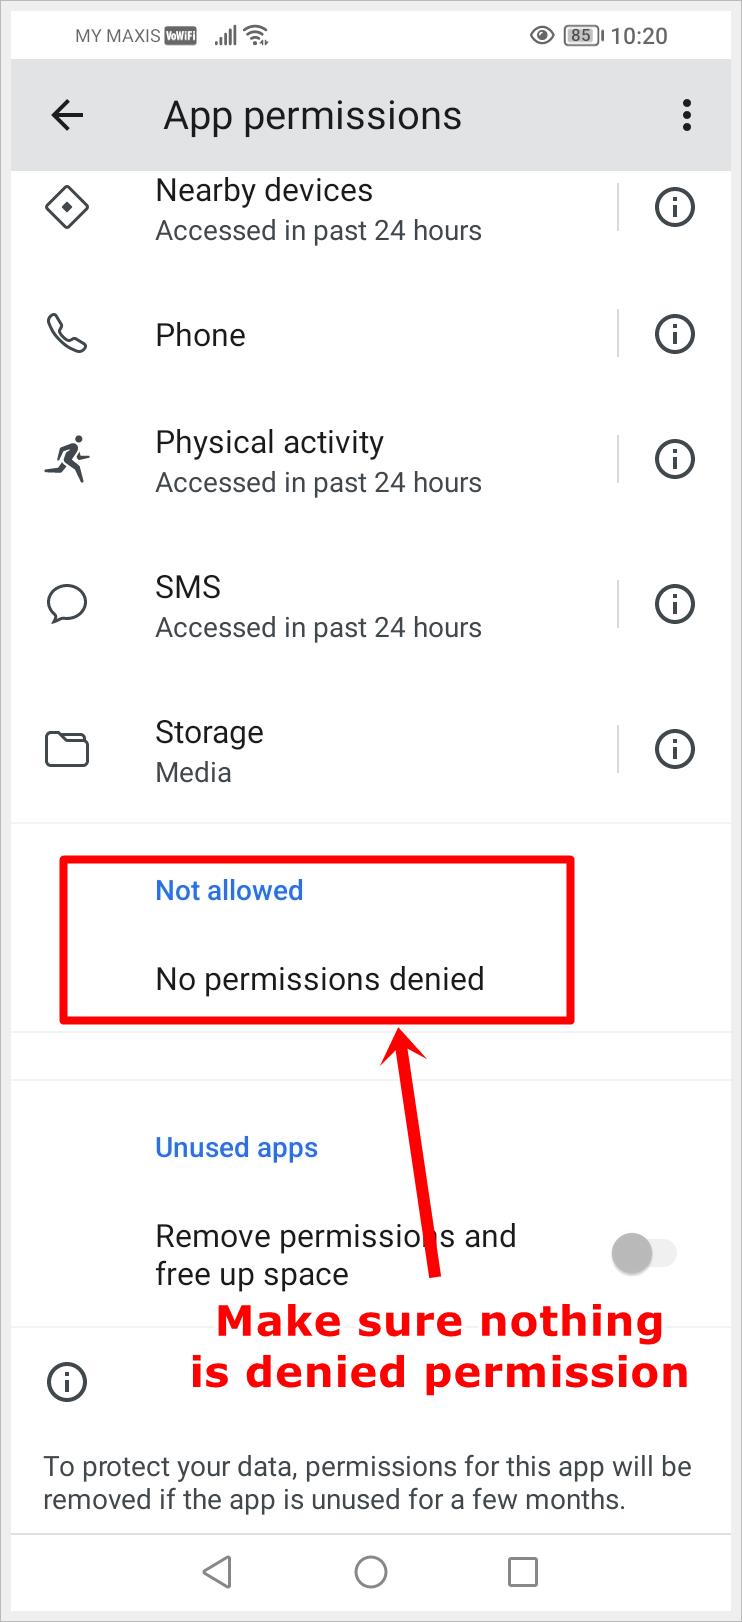
6. Restart Your Device: After verifying and adjusting permissions, restart your Android device.
11. Factory Reset (As a Last Resort)
A factory reset is the last resort when all other methods have failed to fix the “Google Play Services Keeps Stopping” error. This step essentially wipes your device clean, returning it to its original factory state. While effective in resolving persistent issues, it comes with a significant drawback – you will lose all data, apps, and settings on your device. Consider this step only when other solutions have proven ineffective, and make sure to back up your important data before proceeding.
Here’s how to perform a factory reset:
1. Backup Your Data: Before initiating a factory reset, ensure all your essential data, such as contacts, photos, and documents, is backed up. You can use Google Drive or other backup solutions.
2. Open Settings: Access the “Settings” app on your Android device.

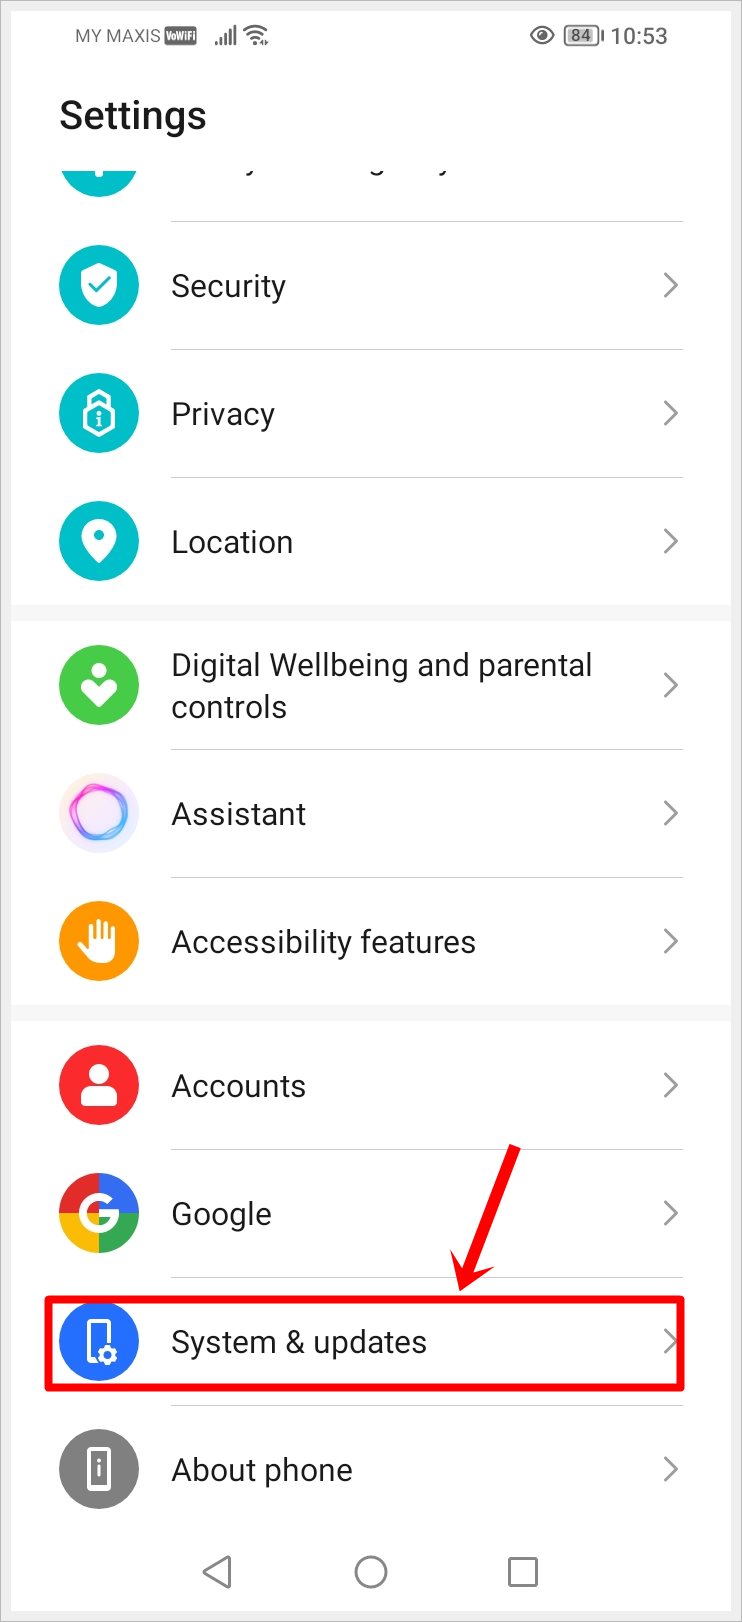
3. Navigate to System: Scroll down and find “System” or “System & updates” in the settings menu. Tap on it.
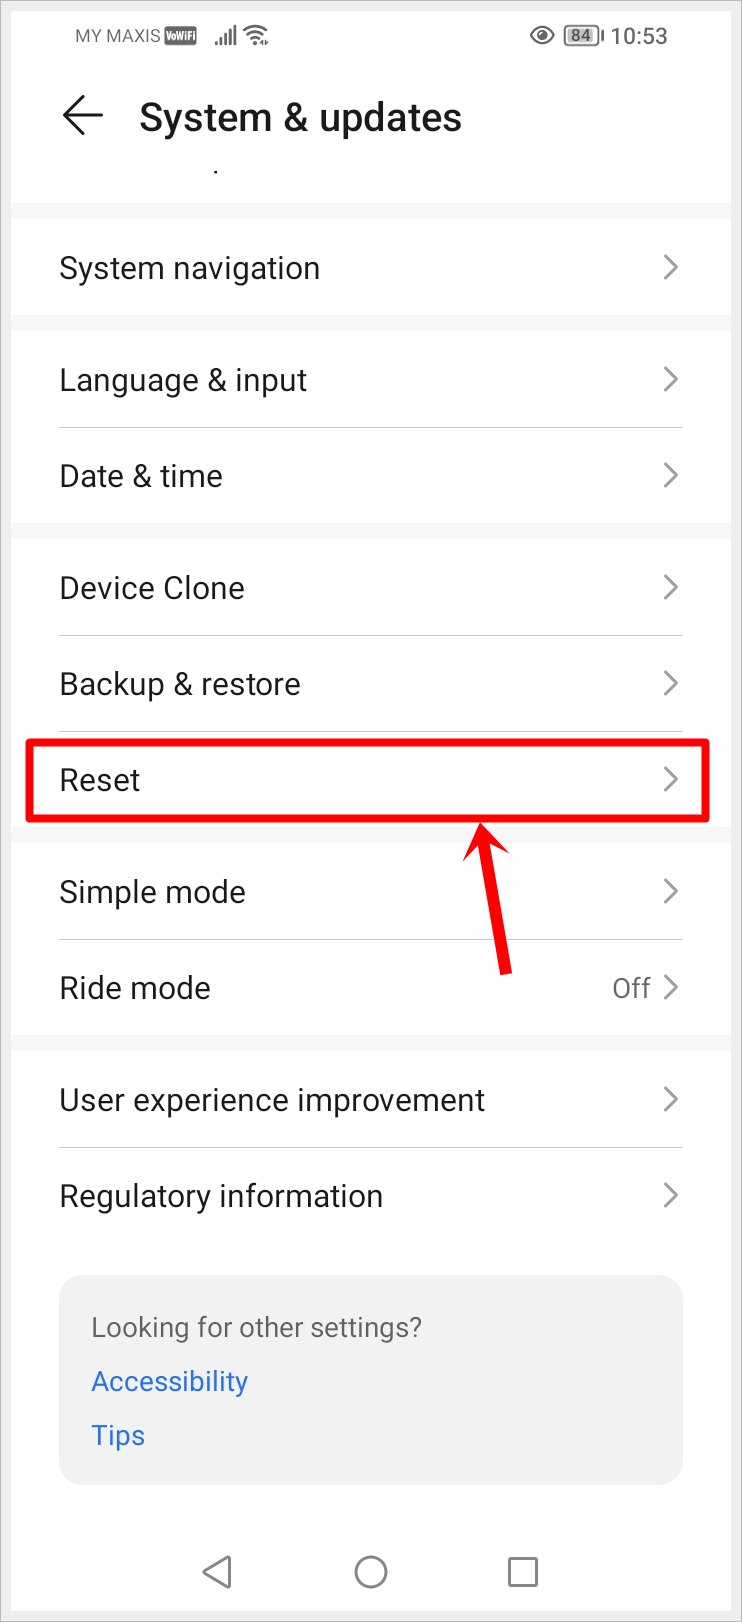
4. Reset Options: Look for an option related to “Reset” or “Reset options.” This may vary slightly depending on your device.
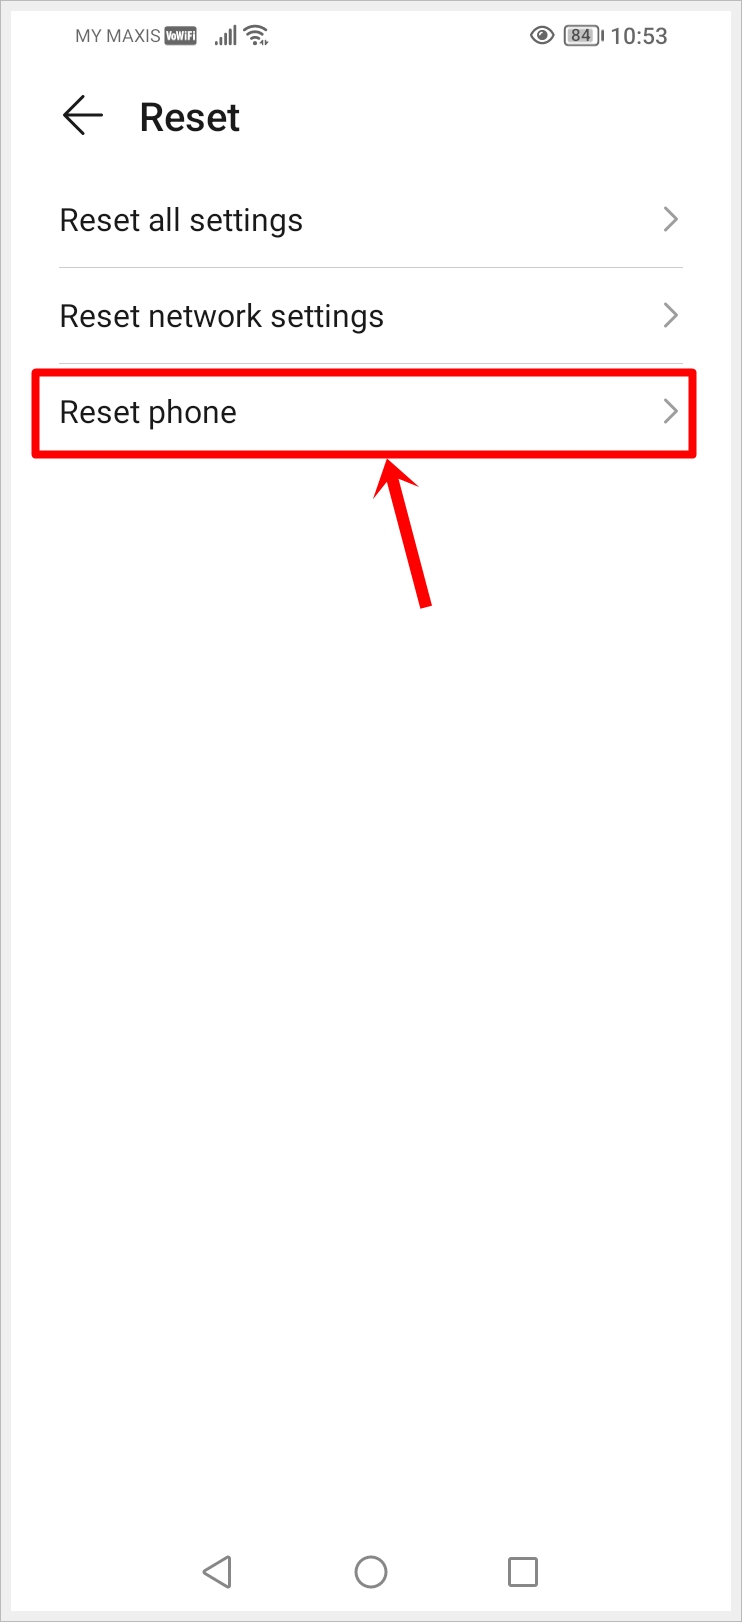
5. Factory Data Reset: Depending on your phone model, choose “Factory data reset”, “Reset phone”, or a similar option.
6. Confirm Reset: Read the information presented about the consequences of a factory reset. If you’re certain, confirm your action to initiate the reset.
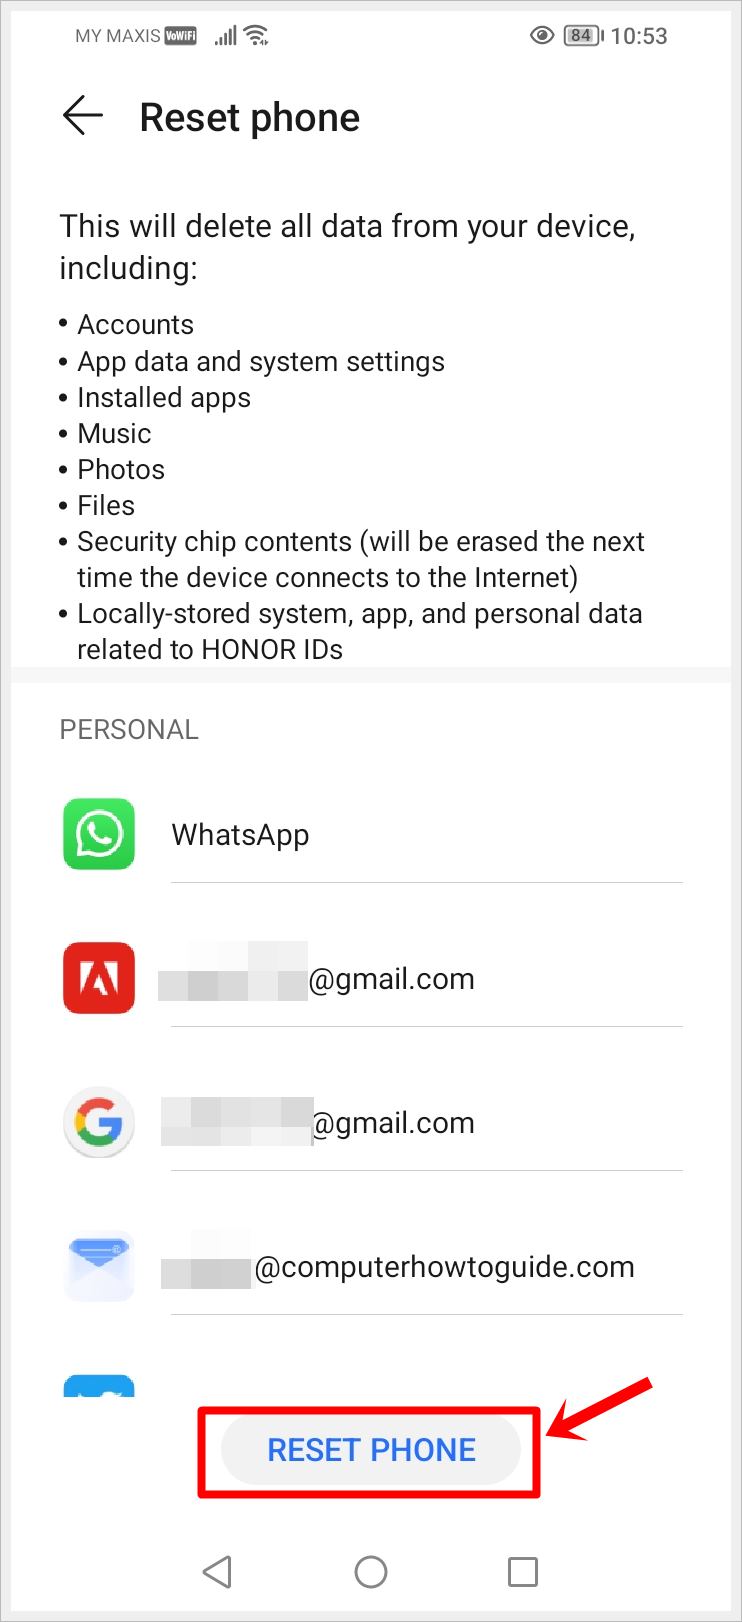
7. Wait for the Process to Complete: The factory reset process may take some time. Allow your device to complete the reset.
8. Set Up Your Device Anew: After the reset is complete, your device will restart and prompt you to set it up as if it were new. Follow the on-screen instructions to configure your device.
Caution:
- A factory reset is irreversible and erases all data on your device.
- Ensure that your data is backed up before proceeding.
- Only perform a factory reset as a last resort when all other fixes have failed
Wrap Up
In resolving the “Google Play Services Keeps Stopping” error, we’ve explored a series of practical fixes, each designed to bring back the smooth operation of your Android device. From clearing cache to a cautious factory reset, these solutions address various potential culprits.
Remember, these fixes are intended to be applied step by step, and a factory reset should only be considered as a last resort. We hope these methods have restored uninterrupted functionality to Google Play Services, allowing you to enjoy your Android experience without interruptions. If issues persist, seeking professional assistance from your device manufacturer or service center is advised. Here’s to a seamlessly functioning Android device!
