When your HDD (Hard Disk Drive) fails to appear in Disk Management, it can be a frustrating and concerning experience. This issue can prevent you from accessing or utilizing your valuable data. In this article, we will delve into the reasons behind the problem and explore effective solutions to resolve it.

Section 1: Understanding the Problem
1.1 Common Symptoms of HDD Not Showing Up in Disk Management
- Disk Management fails to detect the HDD.
- The HDD is not visible in File Explorer.
- The drive letter for the HDD is missing.
1.2 Potential Causes of HDD Not Showing Up
- Connection Issues: Loose cables or faulty connectors can result in a non-responsive HDD.
- Incorrect BIOS Settings: Improper BIOS configurations can lead to the HDD not being recognized.
- Driver Problems: Outdated or incompatible drivers can prevent the system from detecting the HDD.
- Partition or File System Issues: Corrupted partitions or file system errors may cause the HDD to be inaccessible.
- Physical Damage: Physical damage to the HDD or its components can render it undetectable.
Read also: How to Fix a Corrupted Hard Drive: A Step-by-Step Guide
Section 2: Troubleshooting and Solutions
2.1 Basic Troubleshooting Steps
- Ensure proper physical connections: Check cables and connectors for any damage or loose connections.
- Restart the computer: Sometimes, a simple system reboot can resolve temporary glitches.
- Test the HDD on a different system: Connect the HDD to another computer to check if it’s recognized.
- Check BIOS settings: Verify that the BIOS settings are correctly configured to detect the HDD.
2.2 Advanced Solutions
2.2.1 Update or Reinstall Drivers
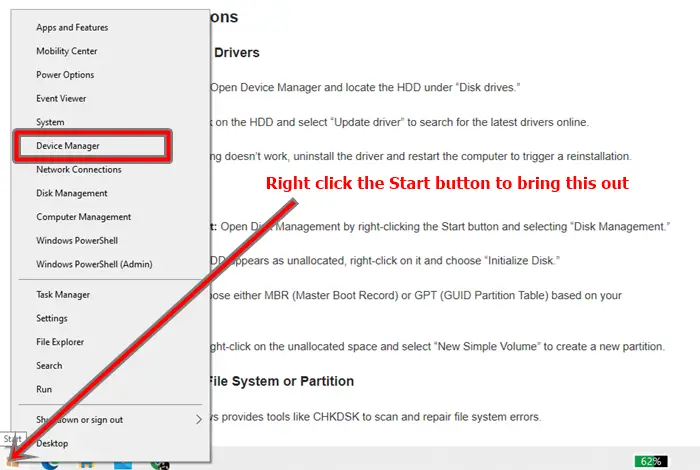
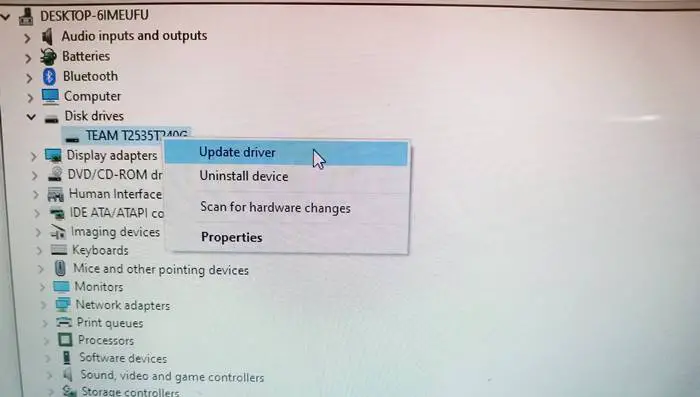
- Access Device Manager: Open Device Manager and locate the HDD under “Disk drives.”
- Update drivers: Right-click on the HDD and select “Update driver” to search for the latest drivers online.
- Reinstall drivers: If updating doesn’t work, uninstall the driver and restart the computer to trigger a reinstallation.
2.2.2 Initialize the HDD
- Launch Disk Management: Open Disk Management by right-clicking the Start button and selecting “Disk Management.”
- Initialize the HDD: If the HDD appears as unallocated, right-click on it and choose “Initialize Disk.”
- Select partition style: Choose either MBR (Master Boot Record) or GPT (GUID Partition Table) based on your requirements.
- Create a new partition: Right-click on the unallocated space and select “New Simple Volume” to create a new partition.
2.2.3 Check and Repair File System or Partition
- Use built-in tools: Windows provides tools like CHKDSK to scan and repair file system errors.
- Third-party tools: Utilize reliable third-party software like EaseUS Partition Master or MiniTool Partition Wizard to fix partition issues.
2.2.4 Professional Data Recovery Services
- In case of physical damage or severe data loss situations, consult professional data recovery services to salvage your important files.
Conclusion
Encountering the issue of an HDD not showing up in Disk Management can be alarming, but with the right troubleshooting steps, most problems can be resolved. By ensuring proper physical connections, updating drivers, initializing the HDD, and repairing file system or partition errors, you can potentially regain access to your valuable data. Remember to backup your important files regularly to minimize the risk of data loss. If all else fails, seek assistance from professional data recovery services.


